 سنتحدث اليوم عن الرسوم البيانية والخوارزميات المرتبطة بها. يعد الرسم البياني واحدًا من أكثر الهياكل مرونة وتنوعًا في البرمجة. يتم تعريف الرسم البياني G عادةً بزوج من المجموعات، أي G = (V, R)، حيث:
- V عبارة عن مجموعة من القمم.
- R عبارة عن مجموعة من الخطوط التي تربط أزواج القمم.
 الخطوط الموجهة بالأقواس:
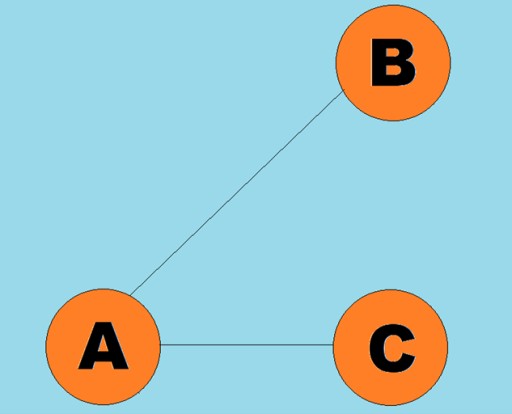
 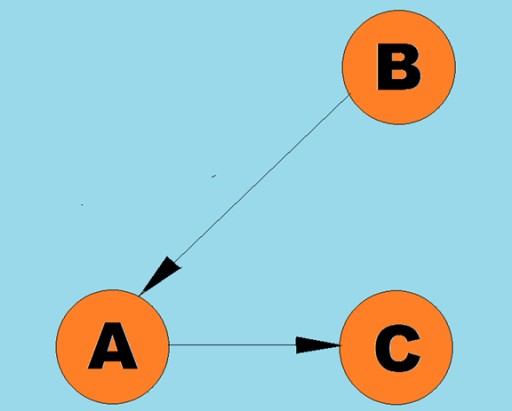 عادة، يتم تمثيل الرسم البياني من خلال رسم تخطيطي حيث يتم توصيل بعض القمم بواسطة الحواف (الأقواس). الرسوم البيانية التي تشير حوافها إلى اتجاه الاجتياز تسمى الرسوم البيانية الموجهة. إذا كان الرسم البياني متصلا بحواف لا تشير إلى اتجاه الاجتياز، فإننا نقول أنه رسم بياني غير موجه. هذا يعني أن الحركة ممكنة في كلا الاتجاهين: من الرأس A إلى الرأس B، ومن الرأس B إلى الرأس A. الرسم البياني المتصل هو رسم بياني يؤدي فيه مسار واحد على الأقل من كل رأس إلى أي رأس آخر (كما في المثال أعلاه). إذا لم يكن الأمر كذلك، فيقال إن الرسم البياني منفصل:
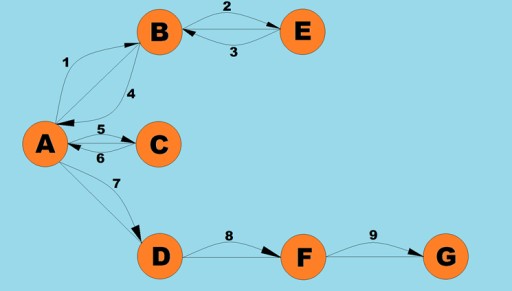
 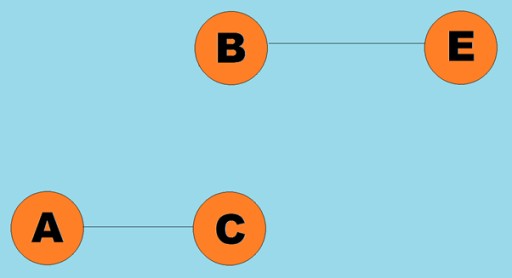 يمكن أيضًا تعيين الأوزان إلى الحواف (الأقواس). الأوزان هي أرقام تمثل، على سبيل المثال، المسافة المادية بين قمتين (أو وقت السفر النسبي بين قمتين). تسمى هذه الرسوم البيانية بالرسوم البيانية المرجحة:
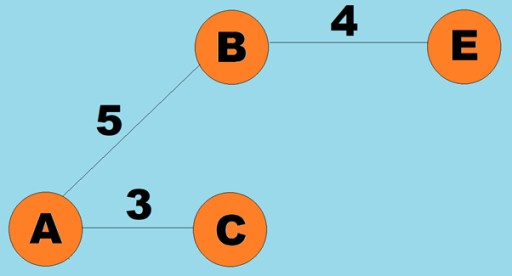
3. خوارزميات تحديد المسار (العمق أولاً، العرض أولاً)
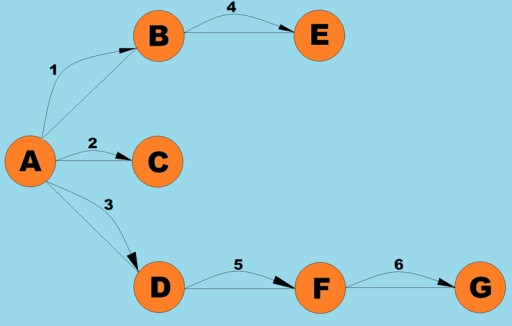
إحدى العمليات الأساسية التي يتم إجراؤها باستخدام الرسوم البيانية هي تحديد جميع القمم التي يمكن الوصول إليها من قمة معينة. تخيل أنك تحاول تحديد كيفية ركوب الحافلة من مدينة إلى أخرى، بما في ذلك التنقلات الممكنة. يمكن الوصول إلى بعض المدن بشكل مباشر، بينما لا يمكن الوصول إلى بعضها إلا عن طريق المرور عبر مدن أخرى. هناك العديد من المواقف الأخرى التي قد تحتاج فيها إلى العثور على جميع القمم التي يمكنك الوصول إليها من قمة معينة. هناك طريقتان رئيسيتان لاجتياز الرسوم البيانية: العمق أولاً والعرض أولاً. سوف نستكشف كلا الأمرين. تجتاز كلتا الطريقتين جميع القمم المتصلة. لمزيد من استكشاف خوارزميات العمق أولاً والعرض أولاً، سنستخدم الرسم البياني التالي:
عمق البحث الأول
هذه إحدى طرق اجتياز الرسم البياني الأكثر شيوعًا. استراتيجية العمق الأول هي التعمق قدر الإمكان في الرسم البياني. ثم بعد الوصول إلى طريق مسدود، نعود إلى أقرب قمة لم تتم زيارتها من قبل. تقوم هذه الخوارزمية بتخزين معلومات على المكدس حول مكان العودة عند الوصول إلى طريق مسدود. قواعد البحث بالعمق الأول:- قم بزيارة قمة مجاورة لم تتم زيارتها من قبل، وقم بوضع علامة عليها على أنها تمت زيارتها، ثم ادفعها إلى المكدس.
- الانتقال إلى هذه القمة.
- كرر الخطوة 1.
- إذا كانت الخطوة 1 مستحيلة، فارجع إلى الرأس السابق وحاول تنفيذ الخطوة 1. إذا لم يكن ذلك ممكنًا، فارجع إلى الرأس الذي قبل ذلك، وهكذا، حتى نجد قمة يمكننا مواصلة الاجتياز منها.
- استمر حتى تصبح جميع القمم على المكدس.
 دعونا نلقي نظرة على الشكل الذي قد يبدو عليه كود Java لهذه الخوارزمية:
public class Graph {
  private final int MAX_VERTS = 10;
  private Vertex vertexArray[]; // Array of vertices
  private int adjMat[][]; // Adjacency matrix
  private int nVerts; // Current number of vertices
  private Stack stack;

  public Graph() { // Initialize internal fields
     vertexArray = new Vertex[MAX_VERTS];
     adjMat = new int[MAX_VERTS][MAX_VERTS];
     nVerts = 0;
     for (int j = 0; j < MAX_VERTS; j++) {
        for (int k = 0; k < MAX_VERTS; k++) {
           adjMat[j][k] = 0;
        }
     }
     stack = new Stack<>();
  }

  public void addVertex(char lab) {
     vertexArray[nVerts++] = new Vertex(lab);
  }

  public void addEdge(int start, int end) {
     adjMat[start][end] = 1;
     adjMat[end][start] = 1;
  }

  public void displayVertex(int v) {
     System.out.println(vertexArray[v].getLabel());
  }

  public void dfs() { // Depth-first search
     vertexArray[0].setVisited(true); // Take the first vertex
     displayVertex(0);
     stack.push(0);

     while (!stack.empty()) {
        int v = getAdjUnvisitedVertex(stack.peek()); // Return the index of the adjacent vertex: if any, 1; if not, -1
        if (v == -1) { // If there is no unvisited adjacent vertex
           stack.pop(); // The element is removed from the stack
        }
        else {
           vertexArray[v].setVisited(true);
           displayVertex(v);
           stack.push(v); // The element goes on top of the stack
        }
     }

     for (int j = 0; j < nVerts; j++) {  // Reset the flags
        vertexArray[j].visited = false;
     }

  }

  private int getAdjUnvisitedVertex(int v) {
     for (int j = 0; j < nVerts; j++) {
        if (adjMat[v][j] == 1 && vertexArray[j].visited == false) {
           return j; // Returns the first vertex found
        }
     }
     return -1;
  }
}
public class Vertex {
  private char label;  // for example, 'A'
  public boolean visited;

  public Vertex(final char label) {
     this.label = label;
     visited = false;
  }

  public char getLabel() {
     return this.label;
  }

  public boolean isVisited() {
     return this.visited;
  }

  public void setVisited(final boolean visited) {
     this.visited = visited;
  }
}public class Solution {
public static void main(String[] args) {
Graph graph = new Graph();
graph.addVertex('A'); //0
graph.addVertex('B'); //1
graph.addVertex('C'); //2
graph.addVertex('D'); //3
graph.addVertex('E'); //4
graph.addVertex('F'); //5
graph.addVertex('G'); //6
graph.addEdge(0,1);
graph.addEdge(0,2);
graph.addEdge(0,3);
graph.addEdge(1,4);
graph.addEdge(3,5);
graph.addEdge(5,6);
System.out.println("Visits: ");
graph.dfs();
}
}بحث العرض الأول
مثل بحث العمق أولاً، تعد هذه الخوارزمية واحدة من أبسط وأبسط طرق اجتياز الرسم البياني. الجوهر هو أن لدينا بعض الذروة الحالية. نضع كل القمم المجاورة غير المزارة في قائمة الانتظار ونختار العنصر التالي (وهو الرأس المخزن في رأس قائمة الانتظار)، والذي يصبح الرأس الحالي... بتقسيم هذه الخوارزمية إلى مراحل، يمكننا تحديد الخطوات التالية:- قم بزيارة القمة التالية التي لم تتم زيارتها سابقًا والمجاورة للقمة الحالية، وقم بوضع علامة عليها كزيارة مسبقًا، ثم قم بإضافتها إلى قائمة الانتظار.
- إذا تعذر تنفيذ الخطوة رقم 1، فقم بإزالة الرأس من قائمة الانتظار واجعله الرأس الحالي.
- إذا لم يكن من الممكن تنفيذ الخطوتين رقم 1 ورقم 2، فقد انتهينا من الاجتياز - تم اجتياز كل قمة (إذا كان لدينا رسم بياني متصل).
 فئة الرسم البياني هنا مطابقة تقريبًا لتلك التي استخدمناها في خوارزمية بحث العمق أولاً، باستثناء طريقة البحث نفسها وحقيقة أن قائمة الانتظار تحل محل المكدس الداخلي:
public class Graph {
  private final int MAX_VERTS = 10;
  private Vertex vertexList[]; // Array of vertices
  private int adjMat[][]; // Adjacency matrix
  private int nVerts; // Current number of vertices
  private Queue queue;

  public Graph() {
     vertexList = new Vertex[MAX_VERTS];
     adjMat = new int[MAX_VERTS][MAX_VERTS];
     nVerts = 0;
     for (int j = 0; j < MAX_VERTS; j++) {
        for (int k = 0; k < MAX_VERTS; k++) {  // Fill the adjacency matrix with zeros
           adjMat[j][k] = 0;
        }
     }
     queue = new PriorityQueue<>();
  }

  public void addVertex(char lab) {
     vertexList[nVerts++] = new Vertex(lab);
  }

  public void addEdge(int start, int end) {
     adjMat[start][end] = 1;
     adjMat[end][start] = 1;
  }

  public void displayVertex(int v) {
     System.out.println(vertexList[v].getLabel());
  }

  public void bfc() { // Depth-first search
     vertexList[0].setVisited(true);
     displayVertex(0);
     queue.add(0);
     int v2;

     while (!queue.isEmpty()) {
        int v = queue.remove();

        while((v2 = getAdjUnvisitedVertex(v))!=-1) {// The loop runs until every adjacent vertex is found and added to the queue
           vertexList[v2].visited = true;
           displayVertex(v2);
           queue.add(v2);
        }
     }

     for (int j = 0; j < nVerts; j++) {  // Reset the flags
        vertexList[j].visited = false;
     }

  }

  private int getAdjUnvisitedVertex(int v) {
     for (int j = 0; j < nVerts; j++) {
        if (adjMat[v][j] == 1 && vertexList[j].visited == false) {
           return j; // Returns the first vertext found
        }
     }
     return -1;
  }
}public class Solution {
public static void main(String[] args) {
Graph graph = new Graph();
graph.addVertex('A'); //0
graph.addVertex('B'); //1
graph.addVertex('C'); //2
graph.addVertex('D'); //3
graph.addVertex('E'); //4
graph.addVertex('F'); //5
graph.addVertex('G'); //6
graph.addEdge(0,1);
graph.addEdge(0,2);
graph.addEdge(0,3);
graph.addEdge(1,4);
graph.addEdge(3,5);
graph.addEdge(5,6);
System.out.println("Visits: ");
graph.bfc();
}
}4. خوارزمية ديكسترا
كما ذكرنا سابقًا، يمكن أن تكون الرسوم البيانية موجهة أو غير موجهة. وسوف تتذكر أنه يمكن أيضًا ترجيحها. غالبًا ما توجد علاقات نماذج الرسوم البيانية الموزونة والموجهة في الحياة الواقعية: على سبيل المثال، خريطة للمدن حيث تكون المدن عبارة عن قمم، والحواف بينها عبارة عن طرق ذات حركة مرور في اتجاه واحد، تتدفق في اتجاه الحافة الموجهة. لنفترض أنك شركة شحن وتحتاج إلى العثور على أقصر طريق بين مدينتين بعيدتين. كيف يمكنك أن تفعل ذلك؟ يعد العثور على أقصر مسار بين رأسين أحد أكثر المشكلات شيوعًا التي يتم حلها باستخدام الرسوم البيانية الموزونة. لحل هذه المشكلة، نستخدم خوارزمية ديكسترا. بمجرد تشغيله، ستعرف أقصر المسارات من قمة أولية معينة إلى جميع المسارات الأخرى. ما هي خطوات هذه الخوارزمية؟ سأحاول الإجابة على هذا السؤال. خطوات خوارزمية ديكسترا:- الخطوة 1: ابحث عن العقدة المجاورة التي لديها أقل تكلفة للانتقال إليها (أقل وزن للحافة). أنت تقف في البداية وتفكر في المكان الذي ستذهب إليه: إلى العقدة "أ" أو العقدة "ب". ما هي تكلفة الانتقال إلى كل من هذه العقد؟
- الخطوة 2: احسب المسافة اللازمة للسفر إلى جميع جيران العقدة B الذين لم تتم زيارتهم بعد بواسطة الخوارزمية عند اجتياز الحافة من B. إذا كانت المسافة الجديدة أقل من المسافة القديمة، فإن المسار عبر الحافة B يصبح أقصر مسار جديد لهذه القمة.
- الخطوة 3: ضع علامة على قمة B كما تمت زيارتها.
- الخطوة 4: انتقل إلى الخطوة 1.
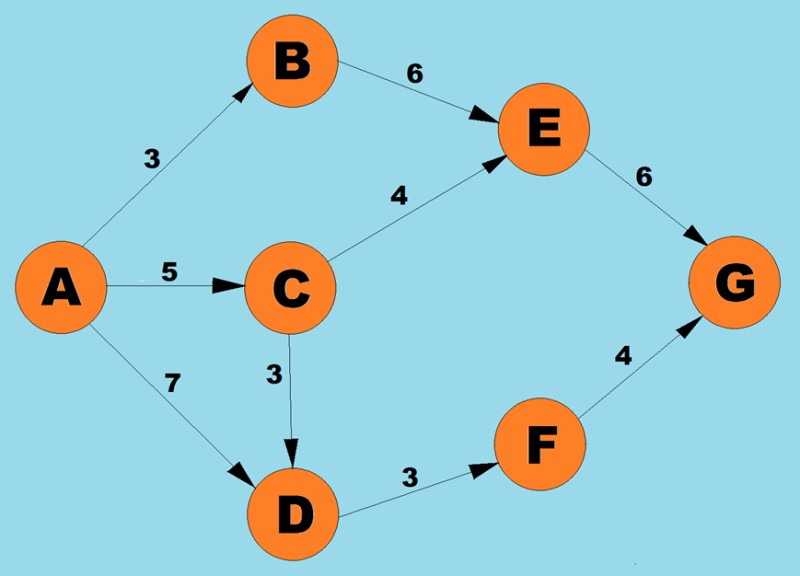 باستخدام الخوارزمية المذكورة أعلاه، سنحدد أقصر مسار من A إلى G:
- هناك ثلاثة مسارات محتملة للقمة A: إلى B بالوزن 3، إلى С بالوزن 5، وإلى D بالوزن 7. وفقًا للخطوة الأولى من الخوارزمية، نختار العقدة ذات التكلفة الأقل (وزن الحافة). في هذه الحالة، ب.
-
نظرًا لأن الجار الوحيد لـ B الذي لم تتم زيارته هو القمة E، فإننا نتحقق من المسار الذي سيكون عليه إذا مررنا عبر هذه القمة. 3(أ ب) + 6 (ب) = 9.
وبذلك نسجل أن أقصر طريق حالي من A إلى E هو 9.
-
بما أن عملنا مع الرأس B قد اكتمل، فإننا ننتقل إلى اختيار الرأس التالي الذي تكون حافته ذات أقل وزن.
من الرؤوس A وB، الاحتمالات هي الرؤوس D (7)، C (5)، أو E (6).
الحافة إلى С لها أصغر وزن، لذلك نذهب إلى هذه القمة.
-
بعد ذلك، كما كان من قبل، نجد أقصر طريق إلى القمم المجاورة عند المرور عبر C:
-
AD = 5 (AC) + 3 (CD) = 8، ولكن بما أن المسار الأقصر السابق (AC = 7) أقل من هذا المسار حتى С، فإننا نحتفظ بأقصر مسار (AC = 7) دون تغيير.
-
CE = 5(AC) + 4(CE) = 9. هذا المسار الأقصر الجديد يساوي المسار السابق، لذلك نتركه أيضًا دون تغيير.
-
-
من أقرب القمم التي يمكن الوصول إليها (E وD)، حدد الرأس ذو أصغر وزن للحافة، أي D (3).
-
نجد أقصر طريق إلى جارتها F.
التركيز البؤري التلقائي = 7(م) + 3(مدافع) = 9
-
من أقرب القمم التي يمكن الوصول إليها (E وF)، حدد الرأس ذو أصغر وزن للحافة، أي F (3).
-
ابحث عن أقصر طريق إلى جارتها G.
AG = 7(AD) + 3(DF) + 4(FG) = 14
إذن، وجدنا طريقًا من A إلى G.
ولكن للتأكد من أنه الأقصر، يجب علينا أيضًا تنفيذ خطواتنا على الرأس E.
-
نظرًا لأن الرأس G لا يحتوي على رؤوس مجاورة تشير إليها حواف موجهة، لم يتبق لدينا سوى الرأس E، لذلك اخترناه.
-
ابحث عن أقصر طريق إلى الجار G.
AG = 3 (AB) + 6 (BE) + 6 (EG) = 15. هذا المسار أطول من أقصر مسار سابق (AG (14))، لذلك نترك هذا المسار دون تغيير.
نظرًا لعدم وجود رؤوس تبدأ من G، فليس من المنطقي تنفيذ خطوات الخوارزمية على هذه القمة. وهذا يعني أن عمل الخوارزمية قد اكتمل.
public class Vertex {
   private char label;
   private boolean isInTree;

   public Vertex(char label) {
       this.label = label;
       this.isInTree = false;
   }

   public char getLabel() {
       return label;
   }

   public void setLabel(char label) {
       this.label = label;
   }

   public boolean isInTree() {
       return isInTree;
   }

   public void setInTree(boolean inTree) {
       isInTree = inTree;
   }
}public class Path { // A class that contains the distance and the previous and traversed vertices
private int distance; // Current distance from the starting vertex
private List parentVertices; // Current parent vertex
public Path(int distance) {
this.distance = distance;
this.parentVertices = new ArrayList<>();
}
public int getDistance() {
return distance;
}
public void setDistance(int distance) {
this.distance = distance;
}
public List getParentVertices() {
return parentVertices;
}
public void setParentVertices(List parentVertices) {
this.parentVertices = parentVertices;
}
}public class Graph {
private final int MAX_VERTS = 10;// Maximum number of vertices
private final int INFINITY = 100000000; // This number represents infinity
private Vertex vertexList[]; // List of vertices
private int relationMatrix[][]; // Matrix of edges between vertices
private int numberOfVertices; // Current number of vertices
private int numberOfVerticesInTree; // Number of visited vertices in the tree
private List shortestPaths; // List of shortest paths
private int currentVertex; // Current vertex
private int startToCurrent; // Distance to currentVertex
public Graph() {
vertexList = new Vertex[MAX_VERTS]; // Adjacency matrix
relationMatrix = new int[MAX_VERTS][MAX_VERTS];
numberOfVertices = 0;
numberOfVerticesInTree = 0;
for (int i = 0; i < MAX_VERTS; i++) { // Fill the adjacency matrix
for (int k = 0; k < MAX_VERTS; k++) { // with "infinity"
relationMatrix[i][k] = INFINITY; // Assign default values
shortestPaths = new ArrayList<>(); // Assign an empty list
}
}
}
public void addVertex(char lab) {// Assign new vertices
vertexList[numberOfVertices++] = new Vertex(lab);
}
public void addEdge(int start, int end, int weight) {
relationMatrix[start][end] = weight; // Set weighted edges between vertices
}
public void path() { // Choose the shortest path
// Set the initial vertex data
int startTree = 0; // Start from vertex 0
vertexList[startTree].setInTree(true); // Include the first element in the tree
numberOfVerticesInTree = 1;
// Fill out the shortest paths for vertices adjacent to the initial vertex
for (int i = 0; i < numberOfVertices; i++) {
int tempDist = relationMatrix[startTree][i];
Path path = new Path(tempDist);
path.getParentVertices().add(0);// The starting vertex will always be a parent vertex
shortestPaths.add(path);
}
// Until every vertex is in the tree
while (numberOfVerticesInTree < numberOfVertices) { // Do this until the number of of vertices in the tree equals the total number of vertices
int indexMin = getMin();// Get the index of the of the vertex with the smallest distance from the vertices not yet in the tree
int minDist = shortestPaths.get(indexMin).getDistance(); // Minimum distance to the vertices not yet in the tree
if (minDist == INFINITY) {
System.out.println("The graph has an unreachable vertex");
break; // If only unreachable vertices have not been visited, then we exit the loop
} else {
currentVertex = indexMin; // Set currentVert to the index of the current vertex
startToCurrent = shortestPaths.get(indexMin).getDistance(); // Set the distance to the current vertex
}
vertexList[currentVertex].setInTree(true); // Add the current vertex to the tree
numberOfVerticesInTree++; // Increase the count of vertices in the tree
updateShortestPaths(); // Update the list of shortest paths
}
displayPaths(); // Display the results on the console
}
public void clear() { // Clear the tree
numberOfVerticesInTree = 0;
for (int i = 0; i < numberOfVertices; i++) {
vertexList[i].setInTree(false);
}
}
private int getMin() {
int minDist = INFINITY; // The distance of the initial shortest path is taken to be infinite
int indexMin = 0;
for (int i = 1; i < numberOfVertices; i++) { // For each vertex
if (!vertexList[i].isInTree() && shortestPaths.get(i).getDistance() < minDist) { // If the vertex is not yet in the tree and the distance to the vertex is less than the current minimum
minDist = shortestPaths.get(i).getDistance(); // then update the minimum
indexMin = i; // Update the index of the vertex with the minimum distance
}
}
return indexMin; // Returns the index of the vertex with the smallest distance among those not yet in the tree
}
private void updateShortestPaths() {
int vertexIndex = 1; // The initial vertex is skipped
while (vertexIndex < numberOfVertices) { // Run over the columns
if (vertexList[vertexIndex].isInTree()) { // If the column vertex is already in the tree, then we skip it
vertexIndex++;
continue;
}
// Calculate the distance for one element sPath
// Get the edge from currentVert to column
int currentToFringe = relationMatrix[currentVertex][vertexIndex];
// Add up all the distances
int startToFringe = startToCurrent + currentToFringe;
// Determine the distance to the current vertexIndex
int shortPathDistance = shortestPaths.get(vertexIndex).getDistance();
// Compare the distance through currentVertex with the current distance in the vertex with index vertexIndex
if (startToFringe < shortPathDistance) { // If it is smaller, then the vertex at vertexIndex is assigned the new shortest path
List newParents = new ArrayList<>(shortestPaths.get(currentVertex).getParentVertices()); // Create a copy of the list of vertices of vertex currentVert's parents
newParents.add(currentVertex); // And add currentVertex to it as the previous vertex
shortestPaths.get(vertexIndex).setParentVertices(newParents); // Save the new path
shortestPaths.get(vertexIndex).setDistance(startToFringe); // Save the new distance
}
vertexIndex++;
}
}
private void displayPaths() { // A method for displaying the shortest paths on the screen
for (int i = 0; i < numberOfVertices; i++) {
System.out.print(vertexList[i].getLabel() + " = ");
if (shortestPaths.get(i).getDistance() == INFINITY) {
System.out.println("0");
} else {
String result = shortestPaths.get(i).getDistance() + " (";
List parents = shortestPaths.get(i).getParentVertices();
for (int j = 0; j < parents.size(); j++) {
result += vertexList[parents.get(j)].getLabel() + " -> ";
}
System.out.println(result + vertexList[i].getLabel() + ")");
}
}
}
}
public class Solution {

   public static void main(String[] args) {
       Graph graph = new Graph();
       graph.addVertex('A');
       graph.addVertex('B');
       graph.addVertex('C');
       graph.addVertex('D');
       graph.addVertex('E');
       graph.addVertex('F');
       graph.addVertex('G');

       graph.addEdge(0, 1, 3);
       graph.addEdge(0, 2, 5);
       graph.addEdge(0, 3, 7);
       graph.addEdge(1, 4, 6);
       graph.addEdge(2, 4, 4);
       graph.addEdge(2, 3, 3);
       graph.addEdge(3, 5, 3);
       graph.addEdge(4, 6, 6);
       graph.addEdge(5, 6, 4);

       System.out.println("The following nodes form the shortest paths from node A:");
       graph.path();
       graph.clear();
   }
}
GO TO FULL VERSION