 היום נדבר על גרפים ועל האלגוריתמים הקשורים אליהם. גרף הוא אחד המבנים הגמישים והרב-תכליתיים ביותר בתכנות. הגרף G מוגדר בדרך כלל על ידי זוג קבוצות, כלומר G = (V, R), כאשר:
- V הוא קבוצה של קודקודים;
- R היא קבוצה של קווים המחברים בין זוגות של קודקודים.
 קווים מכוונים נקראים קשתות:
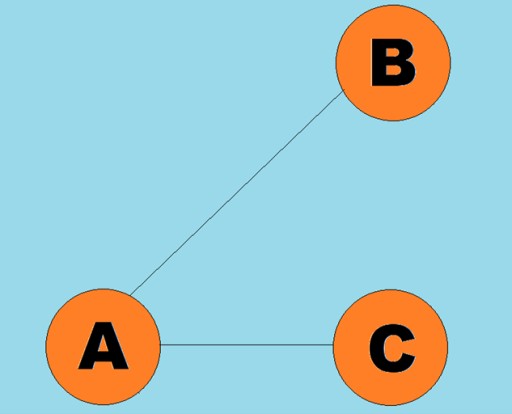
 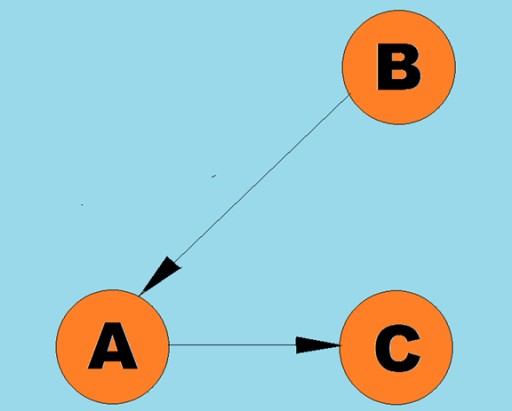 בדרך כלל, גרף מיוצג על ידי דיאגרמה שבה חלק מהקודקודים מחוברים בקצוות (קשתות). גרפים שהקצוות שלהם מציינים כיוון חצייה נקראים גרפים מכוונים. אם גרף מחובר בקצוות שאינם מציינים את כיוון המעבר, אז אנו אומרים שזהו גרף לא מכוון. המשמעות היא שתנועה אפשרית בשני הכיוונים: גם מקודקוד A לקודקוד B, וגם מקודקוד B לקודקוד A. גרף מחובר הוא גרף שבו לפחות נתיב אחד מוביל מכל קודקוד לכל קודקוד אחר (כמו ב- דוגמה למעלה). אם זה לא המקרה, אז אומרים שהגרף מנותק:
 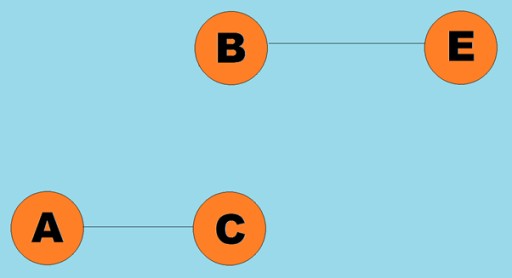 ניתן להקצות משקלים גם לקצוות (קשתות). המשקולות הן מספרים המייצגים, למשל, את המרחק הפיזי בין שני קודקודים (או את זמן הנסיעה היחסי בין שני קודקודים). גרפים אלה נקראים גרפים משוקללים:
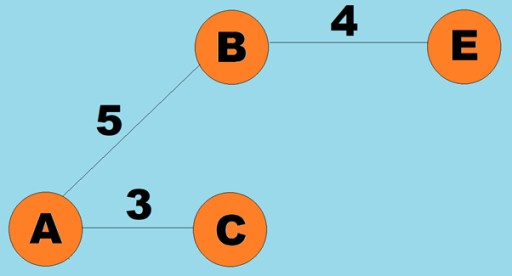
3. אלגוריתמים לאיתור נתיבים (העומק-ראשון, הרוחב-ראשון)
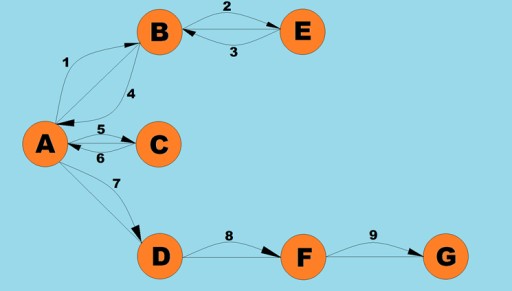
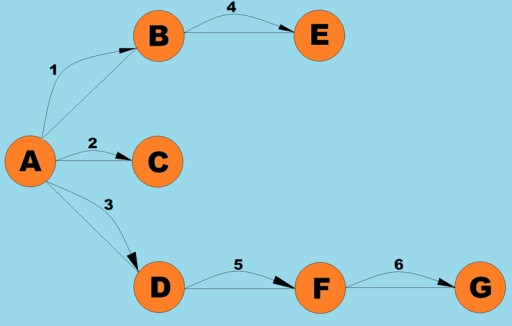
אחת הפעולות הבסיסיות המבוצעות עם גרפים היא קביעת כל הקודקודים שניתן להגיע אליהם מקודקוד נתון. תארו לעצמכם שאתם מנסים לקבוע כיצד תוכלו לנסוע באוטובוס מעיר אחת לאחרת, כולל העברות אפשריות. לחלק מהערים ניתן להגיע ישירות, ולחלקם ניתן להגיע רק על ידי מעבר בערים אחרות. ישנם מצבים רבים אחרים שבהם ייתכן שתצטרך למצוא את כל הקודקודים אליהם אתה יכול להגיע מקודקוד נתון. ישנן שתי דרכים עיקריות לחצות גרפים: עומק-ראשון ורוחב-ראשון. נחקור את שניהם. שתי השיטות חוצות את כל הקודקודים המחוברים. כדי להמשיך ולחקור אלגוריתמים של עומק ראשון ושל רוחב ראשון, נשתמש בגרף הבא:
חיפוש עומק ראשון
זוהי אחת השיטות הנפוצות ביותר למעבר גרפים. אסטרטגיית העומק-ראשון היא ללכת עמוק ככל האפשר בגרף. לאחר מכן, לאחר שהגענו למבוי סתום, אנו חוזרים לקודקוד הקרוב ביותר שיש בו בעבר קודקודים סמוכים שלא ביקרו בו. אלגוריתם זה מאחסן מידע בערימה לגבי היכן לחזור כאשר מגיעים למבוי סתום. כללים לחיפוש עומק ראשון:- בקר בקודקוד סמוך שלא ביקר בעבר, סמן אותו כביקור ודחוף אותו אל הערימה.
- עברו לקודקוד זה.
- חזור על שלב 1.
- אם שלב 1 בלתי אפשרי, חזרו לקודקוד הקודם ונסו לבצע שלב 1. אם זה לא אפשרי, חזרו לקודקוד שלפני אותו, וכן הלאה, עד שנמצא קודקוד שממנו נוכל להמשיך את המעבר.
- המשך עד שכל הקודקודים על הערימה.
 בואו נסתכל כיצד עשוי להיראות קוד Java עבור אלגוריתם זה:
public class Graph {
  private final int MAX_VERTS = 10;
  private Vertex vertexArray[]; // Array of vertices
  private int adjMat[][]; // Adjacency matrix
  private int nVerts; // Current number of vertices
  private Stack stack;

  public Graph() { // Initialize internal fields
     vertexArray = new Vertex[MAX_VERTS];
     adjMat = new int[MAX_VERTS][MAX_VERTS];
     nVerts = 0;
     for (int j = 0; j < MAX_VERTS; j++) {
        for (int k = 0; k < MAX_VERTS; k++) {
           adjMat[j][k] = 0;
        }
     }
     stack = new Stack<>();
  }

  public void addVertex(char lab) {
     vertexArray[nVerts++] = new Vertex(lab);
  }

  public void addEdge(int start, int end) {
     adjMat[start][end] = 1;
     adjMat[end][start] = 1;
  }

  public void displayVertex(int v) {
     System.out.println(vertexArray[v].getLabel());
  }

  public void dfs() { // Depth-first search
     vertexArray[0].setVisited(true); // Take the first vertex
     displayVertex(0);
     stack.push(0);

     while (!stack.empty()) {
        int v = getAdjUnvisitedVertex(stack.peek()); // Return the index of the adjacent vertex: if any, 1; if not, -1
        if (v == -1) { // If there is no unvisited adjacent vertex
           stack.pop(); // The element is removed from the stack
        }
        else {
           vertexArray[v].setVisited(true);
           displayVertex(v);
           stack.push(v); // The element goes on top of the stack
        }
     }

     for (int j = 0; j < nVerts; j++) {  // Reset the flags
        vertexArray[j].visited = false;
     }

  }

  private int getAdjUnvisitedVertex(int v) {
     for (int j = 0; j < nVerts; j++) {
        if (adjMat[v][j] == 1 && vertexArray[j].visited == false) {
           return j; // Returns the first vertex found
        }
     }
     return -1;
  }
}
public class Vertex {
  private char label;  // for example, 'A'
  public boolean visited;

  public Vertex(final char label) {
     this.label = label;
     visited = false;
  }

  public char getLabel() {
     return this.label;
  }

  public boolean isVisited() {
     return this.visited;
  }

  public void setVisited(final boolean visited) {
     this.visited = visited;
  }
}public class Solution {
public static void main(String[] args) {
Graph graph = new Graph();
graph.addVertex('A'); //0
graph.addVertex('B'); //1
graph.addVertex('C'); //2
graph.addVertex('D'); //3
graph.addVertex('E'); //4
graph.addVertex('F'); //5
graph.addVertex('G'); //6
graph.addEdge(0,1);
graph.addEdge(0,2);
graph.addEdge(0,3);
graph.addEdge(1,4);
graph.addEdge(3,5);
graph.addEdge(5,6);
System.out.println("Visits: ");
graph.dfs();
}
}חיפוש רוחב ראשון
כמו חיפוש עומק ראשון, אלגוריתם זה הוא אחת משיטות חציית הגרפים הפשוטות והבסיסיות ביותר. העיקר הוא שיש לנו איזה קודקוד נוכחי. אנחנו מכניסים את כל הקודקודים הסמוכים שלו שלא ביקרו לתור ובוחרים את האלמנט הבא (שהוא הקודקוד המאוחסן בראש התור), שהופך לקודקוד הנוכחי... אם מפרקים את האלגוריתם הזה לשלבים, נוכל לזהות את השלבים הבאים:- בקר בקודקוד הבא שלא ביקר בעבר בצמוד לקודקוד הנוכחי, סמן אותו כמי שביקר בו מראש, והוסף אותו לתור.
- אם לא ניתן לבצע את שלב #1, הסר את הקודקוד מהתור והפוך אותו לקודקוד הנוכחי.
- אם לא ניתן לבצע את שלבים מס' 1 ו-#2, סיימנו לעבור - כל קודקוד נחצה (אם יש לנו גרף מחובר).
 מחלקת הגרף כאן כמעט זהה לזו שבה השתמשנו עבור אלגוריתם החיפוש העומק-ראשון, מלבד שיטת החיפוש עצמה והעובדה שתור מחליף את המחסנית הפנימית:
public class Graph {
  private final int MAX_VERTS = 10;
  private Vertex vertexList[]; // Array of vertices
  private int adjMat[][]; // Adjacency matrix
  private int nVerts; // Current number of vertices
  private Queue queue;

  public Graph() {
     vertexList = new Vertex[MAX_VERTS];
     adjMat = new int[MAX_VERTS][MAX_VERTS];
     nVerts = 0;
     for (int j = 0; j < MAX_VERTS; j++) {
        for (int k = 0; k < MAX_VERTS; k++) {  // Fill the adjacency matrix with zeros
           adjMat[j][k] = 0;
        }
     }
     queue = new PriorityQueue<>();
  }

  public void addVertex(char lab) {
     vertexList[nVerts++] = new Vertex(lab);
  }

  public void addEdge(int start, int end) {
     adjMat[start][end] = 1;
     adjMat[end][start] = 1;
  }

  public void displayVertex(int v) {
     System.out.println(vertexList[v].getLabel());
  }

  public void bfc() { // Depth-first search
     vertexList[0].setVisited(true);
     displayVertex(0);
     queue.add(0);
     int v2;

     while (!queue.isEmpty()) {
        int v = queue.remove();

        while((v2 = getAdjUnvisitedVertex(v))!=-1) {// The loop runs until every adjacent vertex is found and added to the queue
           vertexList[v2].visited = true;
           displayVertex(v2);
           queue.add(v2);
        }
     }

     for (int j = 0; j < nVerts; j++) {  // Reset the flags
        vertexList[j].visited = false;
     }

  }

  private int getAdjUnvisitedVertex(int v) {
     for (int j = 0; j < nVerts; j++) {
        if (adjMat[v][j] == 1 && vertexList[j].visited == false) {
           return j; // Returns the first vertext found
        }
     }
     return -1;
  }
}public class Solution {
public static void main(String[] args) {
Graph graph = new Graph();
graph.addVertex('A'); //0
graph.addVertex('B'); //1
graph.addVertex('C'); //2
graph.addVertex('D'); //3
graph.addVertex('E'); //4
graph.addVertex('F'); //5
graph.addVertex('G'); //6
graph.addEdge(0,1);
graph.addEdge(0,2);
graph.addEdge(0,3);
graph.addEdge(1,4);
graph.addEdge(3,5);
graph.addEdge(5,6);
System.out.println("Visits: ");
graph.bfc();
}
}4. האלגוריתם של דיקסטרה
כפי שהוזכר קודם לכן, גרפים יכולים להיות מכוונים או בלתי מכוונים. ותזכרו שאפשר גם לשקלל אותם. גרפים משוקללים ומכוונים מדגמים קשרים שנמצאים לעתים קרובות בחיים האמיתיים: למשל, מפה של ערים שבהן ערים הן קודקודים, והקצוות ביניהן הם כבישים עם תנועה חד-כיוונית, הזורמת לכיוון הקצה המכוון. נניח שאתה חברת הובלה ואתה צריך למצוא את המסלול הקצר ביותר בין שתי ערים רחוקות. איך היית עושה את זה? מציאת הנתיב הקצר ביותר בין שני קודקודים היא אחת הבעיות הנפוצות ביותר שנפתרות באמצעות גרפים משוקללים. כדי לפתור בעיה זו, אנו משתמשים באלגוריתם של דיקסטרה. ברגע שתפעיל אותו תדע את הנתיבים הקצרים ביותר מקודקוד ראשוני נתון לכל אחד אחר. מהם השלבים של אלגוריתם זה? אנסה לענות על השאלה הזו. שלבי האלגוריתם של דיקסטרה:- שלב 1: מצא את הצומת הסמוך שהעלות הנמוכה ביותר לניווט אליו (משקל הקצה הנמוך ביותר). אתה עומד ממש בהתחלה וחושב לאן ללכת: לצומת A או לצומת B. מה עלות המעבר לכל אחד מהצמתים הללו?
- שלב 2: חשב את המרחק לנסוע לכל השכנים של הצומת В שעדיין לא ביקר בהם האלגוריתם בעת חציית הקצה מ-В. אם המרחק החדש קטן מהמרחק הישן, הנתיב דרך קצה B הופך לנתיב הקצר החדש ביותר עבור קודקוד זה.
- שלב 3: סמן את קודקוד B כמו ביקר.
- שלב 4: עבור לשלב 1.
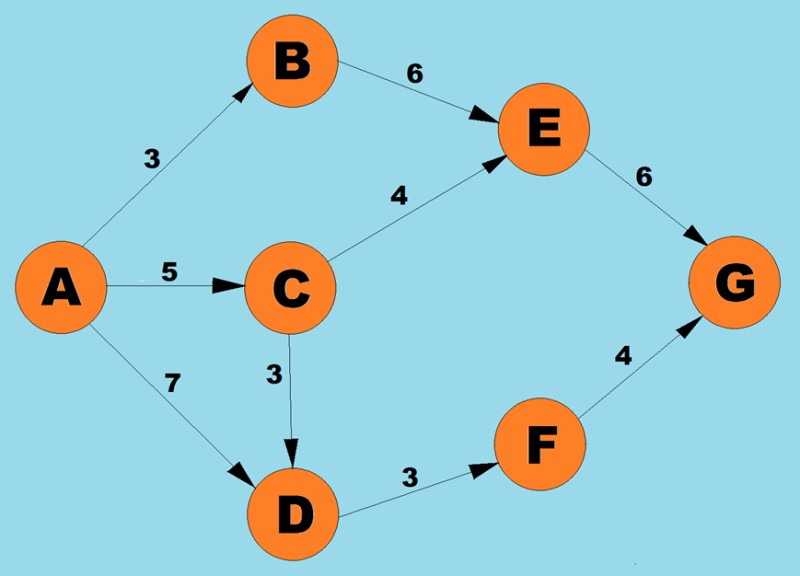 באמצעות האלגוריתם שלעיל, נקבע את הנתיב הקצר ביותר מ-A ל-G:
- ישנם שלושה נתיבים אפשריים לקודקוד A: ל-B עם משקל 3, ל-С עם משקל 5, ול-D עם משקל 7. לפי השלב הראשון של האלגוריתם, אנו בוחרים את הצומת בעל העלות הנמוכה ביותר (משקל קצה). במקרה זה, ב.
-
מכיוון שהשכן היחיד שלא ביקר ב' הוא קודקוד Е, אנחנו בודקים מה יהיה הנתיב אם נעבור דרך הקודקוד הזה. 3(AB) + 6(BE) = 9.
לפיכך, אנו רושמים שהנתיב הקצר ביותר הנוכחי מ-A ל-E הוא 9.
-
מכיוון שהעבודה שלנו עם קודקוד B הסתיימה, אנו ממשיכים לבחירת הקודקוד הבא שלקצה שלו יש משקל מינימלי.
מקודקודים A ו-B, האפשרויות הן קודקודים D (7), C (5), או E (6).
לקצה ל- С יש את המשקל הקטן ביותר, אז אנחנו הולכים לקודקוד הזה.
-
לאחר מכן, כמו קודם, אנו מוצאים את הדרך הקצרה ביותר לקודקודים שכנים כאשר אנו עוברים דרך C:
-
AD = 5 (AC) + 3 (CD) = 8, אך מכיוון שהנתיב הקצר ביותר הקודם (AC = 7) קטן מזה דרך С, אנו שומרים על הנתיב הקצר ביותר (AC = 7) ללא שינוי.
-
CE = 5(AC) + 4(CE) = 9. הנתיב הקצר ביותר הזה שווה לקודם, אז גם אנחנו משאירים אותו ללא שינוי.
-
-
מהקודקודים הנגישים הקרובים ביותר (E ו-D), בחר את הקודקוד עם משקל הקצה הקטן ביותר, כלומר D (3).
-
אנו מוצאים את הדרך הקצרה ביותר לשכנתה F.
AF = 7(AD) + 3(DF) = 9
-
מהקודקודים הנגישים הקרובים ביותר (E ו-F), בחר את הקודקוד עם משקל הקצה הקטן ביותר, כלומר F (3).
-
מצא את השביל הקצר ביותר לשכנתו G.
AG = 7(AD) + 3(DF) + 4(FG) = 14
אז מצאנו נתיב מ-A ל-G.
אבל כדי לוודא שהוא הקצר ביותר, עלינו לבצע את הצעדים שלנו גם בקודקוד E.
-
מכיוון שלקודקוד G אין קודקודים שכנים אליהם מצביעים קצוות מכוונים, נשאר לנו רק קודקוד E, אז אנחנו בוחרים בו.
-
מצא את הדרך הקצרה ביותר לשכנה ג'.
AG = 3 (AB) + 6 (BE) + 6 (EG) = 15. נתיב זה ארוך מהנתיב הקצר ביותר הקודם (AG (14)), ולכן נשאיר את הנתיב הזה ללא שינוי.
מכיוון שאין קודקודים המובילים מ-G, אין זה הגיוני להפעיל את השלבים על האלגוריתם על קודקוד זה. זה אומר שעבודת האלגוריתם הושלמה.
public class Vertex {
   private char label;
   private boolean isInTree;

   public Vertex(char label) {
       this.label = label;
       this.isInTree = false;
   }

   public char getLabel() {
       return label;
   }

   public void setLabel(char label) {
       this.label = label;
   }

   public boolean isInTree() {
       return isInTree;
   }

   public void setInTree(boolean inTree) {
       isInTree = inTree;
   }
}public class Path { // A class that contains the distance and the previous and traversed vertices
private int distance; // Current distance from the starting vertex
private List parentVertices; // Current parent vertex
public Path(int distance) {
this.distance = distance;
this.parentVertices = new ArrayList<>();
}
public int getDistance() {
return distance;
}
public void setDistance(int distance) {
this.distance = distance;
}
public List getParentVertices() {
return parentVertices;
}
public void setParentVertices(List parentVertices) {
this.parentVertices = parentVertices;
}
}public class Graph {
private final int MAX_VERTS = 10;// Maximum number of vertices
private final int INFINITY = 100000000; // This number represents infinity
private Vertex vertexList[]; // List of vertices
private int relationMatrix[][]; // Matrix of edges between vertices
private int numberOfVertices; // Current number of vertices
private int numberOfVerticesInTree; // Number of visited vertices in the tree
private List shortestPaths; // List of shortest paths
private int currentVertex; // Current vertex
private int startToCurrent; // Distance to currentVertex
public Graph() {
vertexList = new Vertex[MAX_VERTS]; // Adjacency matrix
relationMatrix = new int[MAX_VERTS][MAX_VERTS];
numberOfVertices = 0;
numberOfVerticesInTree = 0;
for (int i = 0; i < MAX_VERTS; i++) { // Fill the adjacency matrix
for (int k = 0; k < MAX_VERTS; k++) { // with "infinity"
relationMatrix[i][k] = INFINITY; // Assign default values
shortestPaths = new ArrayList<>(); // Assign an empty list
}
}
}
public void addVertex(char lab) {// Assign new vertices
vertexList[numberOfVertices++] = new Vertex(lab);
}
public void addEdge(int start, int end, int weight) {
relationMatrix[start][end] = weight; // Set weighted edges between vertices
}
public void path() { // Choose the shortest path
// Set the initial vertex data
int startTree = 0; // Start from vertex 0
vertexList[startTree].setInTree(true); // Include the first element in the tree
numberOfVerticesInTree = 1;
// Fill out the shortest paths for vertices adjacent to the initial vertex
for (int i = 0; i < numberOfVertices; i++) {
int tempDist = relationMatrix[startTree][i];
Path path = new Path(tempDist);
path.getParentVertices().add(0);// The starting vertex will always be a parent vertex
shortestPaths.add(path);
}
// Until every vertex is in the tree
while (numberOfVerticesInTree < numberOfVertices) { // Do this until the number of of vertices in the tree equals the total number of vertices
int indexMin = getMin();// Get the index of the of the vertex with the smallest distance from the vertices not yet in the tree
int minDist = shortestPaths.get(indexMin).getDistance(); // Minimum distance to the vertices not yet in the tree
if (minDist == INFINITY) {
System.out.println("The graph has an unreachable vertex");
break; // If only unreachable vertices have not been visited, then we exit the loop
} else {
currentVertex = indexMin; // Set currentVert to the index of the current vertex
startToCurrent = shortestPaths.get(indexMin).getDistance(); // Set the distance to the current vertex
}
vertexList[currentVertex].setInTree(true); // Add the current vertex to the tree
numberOfVerticesInTree++; // Increase the count of vertices in the tree
updateShortestPaths(); // Update the list of shortest paths
}
displayPaths(); // Display the results on the console
}
public void clear() { // Clear the tree
numberOfVerticesInTree = 0;
for (int i = 0; i < numberOfVertices; i++) {
vertexList[i].setInTree(false);
}
}
private int getMin() {
int minDist = INFINITY; // The distance of the initial shortest path is taken to be infinite
int indexMin = 0;
for (int i = 1; i < numberOfVertices; i++) { // For each vertex
if (!vertexList[i].isInTree() && shortestPaths.get(i).getDistance() < minDist) { // If the vertex is not yet in the tree and the distance to the vertex is less than the current minimum
minDist = shortestPaths.get(i).getDistance(); // then update the minimum
indexMin = i; // Update the index of the vertex with the minimum distance
}
}
return indexMin; // Returns the index of the vertex with the smallest distance among those not yet in the tree
}
private void updateShortestPaths() {
int vertexIndex = 1; // The initial vertex is skipped
while (vertexIndex < numberOfVertices) { // Run over the columns
if (vertexList[vertexIndex].isInTree()) { // If the column vertex is already in the tree, then we skip it
vertexIndex++;
continue;
}
// Calculate the distance for one element sPath
// Get the edge from currentVert to column
int currentToFringe = relationMatrix[currentVertex][vertexIndex];
// Add up all the distances
int startToFringe = startToCurrent + currentToFringe;
// Determine the distance to the current vertexIndex
int shortPathDistance = shortestPaths.get(vertexIndex).getDistance();
// Compare the distance through currentVertex with the current distance in the vertex with index vertexIndex
if (startToFringe < shortPathDistance) { // If it is smaller, then the vertex at vertexIndex is assigned the new shortest path
List newParents = new ArrayList<>(shortestPaths.get(currentVertex).getParentVertices()); // Create a copy of the list of vertices of vertex currentVert's parents
newParents.add(currentVertex); // And add currentVertex to it as the previous vertex
shortestPaths.get(vertexIndex).setParentVertices(newParents); // Save the new path
shortestPaths.get(vertexIndex).setDistance(startToFringe); // Save the new distance
}
vertexIndex++;
}
}
private void displayPaths() { // A method for displaying the shortest paths on the screen
for (int i = 0; i < numberOfVertices; i++) {
System.out.print(vertexList[i].getLabel() + " = ");
if (shortestPaths.get(i).getDistance() == INFINITY) {
System.out.println("0");
} else {
String result = shortestPaths.get(i).getDistance() + " (";
List parents = shortestPaths.get(i).getParentVertices();
for (int j = 0; j < parents.size(); j++) {
result += vertexList[parents.get(j)].getLabel() + " -> ";
}
System.out.println(result + vertexList[i].getLabel() + ")");
}
}
}
}
public class Solution {

   public static void main(String[] args) {
       Graph graph = new Graph();
       graph.addVertex('A');
       graph.addVertex('B');
       graph.addVertex('C');
       graph.addVertex('D');
       graph.addVertex('E');
       graph.addVertex('F');
       graph.addVertex('G');

       graph.addEdge(0, 1, 3);
       graph.addEdge(0, 2, 5);
       graph.addEdge(0, 3, 7);
       graph.addEdge(1, 4, 6);
       graph.addEdge(2, 4, 4);
       graph.addEdge(2, 3, 3);
       graph.addEdge(3, 5, 3);
       graph.addEdge(4, 6, 6);
       graph.addEdge(5, 6, 4);

       System.out.println("The following nodes form the shortest paths from node A:");
       graph.path();
       graph.clear();
   }
}
GO TO FULL VERSION