1. A detailed guide to Git for beginners
Today we're going to talk about a version control system, namely Git.
You really can't be a full-fledged programmer without knowing and understanding this tool. Of course, you don't have to keep all the Git commands and features in your head in order to be continuously employed. You need to know a set of commands that will help you understand everything that is happening.
Git basics
Git is a distributed version control system for our code. Why do we need it? Teams need some kind of system for managing their work. It is needed to track changes that occur over time.
That is, we need to be able to see step-by-step which files have changed and how. This is especially important when you are investigating what changed in the context of a single task, making it possible to revert the changes.
Let's imagine the following situation: we have working code, everything in it is good, but then we decide to improve or tweak something. No big deal, but our "improvement" broke half of the program's features and made it impossible to work. So now what? Without Git, you would have to sit and think for hours, trying to remember how everything was originally. But with Git, we just roll back the commit — and that's it.
Or what if there are two developers making their own code changes at the same time? Without Git, they copy the original code files and modify them separately. There comes a time when both want to add their changes to the main directory. What do you do in this case?
There will be no such problems if you use Git.
Installing Git
Let's install Java on your computer This process differs slightly for different operating systems.
Installing on Windows
As usual, you need to download and run an exe file. Everything is simple here: click on the first Google link, perform the install, and that's it. To do this, we will use the bash console provided by Windows.
On Windows, you need to run Git Bash. Here's how it looks in the Start Menu:

Now this is a command prompt you can work with.
To avoid having to go to the folder with the project every time in order to order to open Git there, you can open the command prompt in the project folder with the right mouse button with the path we need:

Installing on Linux
Usually Git is part of Linux distributions and is already installed, since it is a tool that was originally written for Linux kernel development. But there are situations when it is not. To check, you need to open a terminal and write: git --version. If you get an intelligible answer, then nothing needs to be installed.
Open a terminal and install. For Ubuntu, you need to write: sudo apt-get install git. And that's it: now you can use Git in any terminal.
Installing on macOS
Here, too, you first need to check whether Git is already there (see above, the same as on Linux).
If you don't have it, then the easiest way to get it is to download the latest version. If Xcode is installed, then Git will definitely be automatically installed.
Git settings
Git has user settings for the user who will submit work. This makes sense and is necessary, because Git takes this information for the Author field when a commit is created.
Set up a username and password for all your projects by running the following commands:
If you need to change the author for a specific project (for a personal project, for example), you can remove "--global". This will give us the following:
A bit of theory
To dive into the topic, we should introduce you to a few new words and actions... Otherwise, there will be nothing to talk about. Of course, this is jargon that comes to us from English, so I'll add translations in parentheses.
What words and actions?
- git repository
- commit
- branch
- merge
- conflicts
- pull
- push
- how to ignore some files (.gitignore)
And so on.
Statuses in Git
Git has several statues that need to be understood and remembered:
- untracked
- modified
- staged
- committed
How should you understand this?
These are statuses that apply to the files containing our code. In other words, their life cycle usually looks like this:
- A file that is created but not yet added to the repository has the "untracked" status.
- When we make changes to files that have already been added to the Git repository, then their status is "modified".
- Among the files that we have changed, we select the ones that we need (for example, we do not need compiled classes), and these classes are changed to the "staged" status.
- A commit is created from prepared files in the staged state and goes into the Git repository. After that, there are no files with the "staged" status. But there may still be files whose status is "modified".
This is how it looks:

What is a commit?
A commit is the main event when it comes to version control. It contains all the changes made since the commit began. Commits are linked together like a singly linked list.
Specifically, there is a first commit. When the second commit is created, it (the second) knows what comes after the first. And in this manner, information can be tracked.
A commit also has its own information, so-called metadata:
- the commit's unique identifier, which can be used to find it
- the name of the commit's author, who created it
- the date the commit was created
- a comment that describes what was done during the commit
Here's how it looks:

What is a branch?

A branch is a pointer to some commit. Because a commit knows which commit precedes it, when a branch points to a commit, all those previous commits also apply to it.
Accordingly, we could say that you can have as many branches as you want pointing to the same commit.
Work happens in branches, so when a new commit is created, the branch moves its pointer to the more recent commit.

Getting started with Git
You can work with a local repository alone as well as with a remote one.
To practice the required commands, you can limit yourself to the local repository. It only stores all the project's information locally in the .git folder.
If we're talking about the remote repository, then all the information is stored somewhere on the remote server: only a copy of the project is stored locally. Changes made to your local copy can be pushed (git push) to the remote repository.
In our discussion here and below, we are talking about working with Git in the console. Of course, you can use some sort of GUI-based solution (for example, IntelliJ IDEA), but first you should figure out what commands are being executed and what they mean.
Working with Git in a local repository
To create a local repository, you need to write:

This will create a hidden .git folder in the console's current directory.
The .git folder stores all information about the Git repository. Don't delete it ;)
Next, files are added to the project, and they are assigned the "Untracked" status. To check the current status of your work, write this:

We are in the master branch, and here we will remain until we switch to another branch.
This shows which files have changed but have not yet been added to the "staged" status. To add them to the "staged" status, you need to write "git add". We have a few options here, for example:
- git add -A — add all files to the "staged" status
- git add . — add all files from this folder and all subfolders. Essentially the same as the previous one;
- git add <file name> — adds a specific file. Here you can use regular expressions to add files according to some pattern. For example, git add *.java: This means that you only want to add files with the java extension.
The first two options are clearly simple. Things get more interesting with the latest addition, so let's write:
To check the status, we use the command already known to us:

Here you can see that the regular expression has worked correctly: test_resource.txt is now has the "staged" status.
And finally, the last stage for working with a local repository (there is one more when working with the remote repository ;)) — creating a new commit:

Next up is a great command for looking at the commit history on a branch. Let's make use of it:

Here you can see that we have created our first commit and it includes the text that we provided on the command line. It is very important to understand that this text should explain as accurately as possible what was done during this commit. This will help us many times in the future.
An inquisitive reader who has not yet fallen asleep may be wondering what happened to the GitTest.java file. Let's find out right now. To do this, we use:

As you can see, it is still "untracked" and is waiting in the wings. But what if we don't want to add it to the project at all? Sometimes that happens.
To make things more interesting, let's now try to change our test_resource.txt file. Let's add some text there and check the status:

Here you can clearly see the difference between the "untracked" and "modified" statuses.
GitTest.java is "untracked", while test_resource.txt is "modified".
Now that we have files in the modified state, we can examine the changes made to them. This can be done using the following command:

That is, you can clearly see here what I added to our text file: hello world!
Let's add our changes to the text file and create a commit:
To look at all commits, write:

As you can see, we now have two commits.
We'll add GitTest.java in the same way. No comments here, just commands:

Working with .gitignore
Clearly, we only want to keep source code alone, and nothing else, in the repository. So what else could there be? At a minimum, compiled classes and/or files generated by development environments.
To tell Git to ignore them, we need to create a special file. Do this: create a file called .gitignore in the root of the project. Each line in this file represents a pattern to ignore.
In this example, the .gitignore file will look like this:
target/
*.iml
.idea/
Let's take a look:
- The first line is to ignore all files with the .class extension
- The second line is to ignore the "target" folder and everything it contains
- The third line is to ignore all files with the .iml extension
- The fourth line is to ignore the .idea folder
Let's try using an example. To see how it works, let's add the compiled GitTest.class to the project and check the project status:
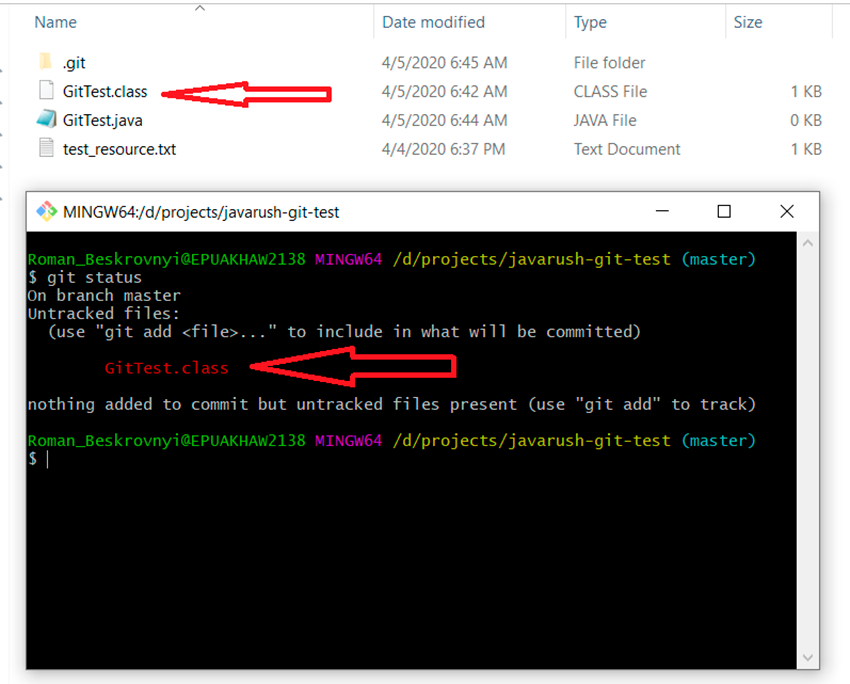
Clearly, we do not want to somehow accidentally add the compiled class to the project (using git add -A). To do this, create a .gitignore file and add everything that was described earlier:

Now let's use a commit to add the .gitignore file to the project:
And now the moment of truth: we have a compiled class GitTest.class that is "untracked", which we did not want to add to the Git repository.
Now we should see the effects of the .gitignore file:

Perfect! .gitignore +1 :)
Working with branches
Naturally, working in just one branch is inconvenient for solitary developers, and it is impossible when there is more than one person on a team. This is why we have branches.
A branch is just a movable pointer to commits.
In this part, we'll explore working in different branches: how to merge changes from one branch into another, what conflicts may arise, and much more.
To see a list of all branches in the repository and understand which one you are in, you need to write:

You can see that we only have one master branch. The asterisk in front of it indicates that we are in it. By the way, you can also use the "git status" command to find out which branch we are in.
Then there are several options for creating branches (there may be more — these are the ones that I use):
- create a new branch based on the one we are in (99% of cases)
- create a branch based on a specific commit (1% of cases)
Let's create a branch based on a specific commit
We will rely on the commit's unique identifier. To find it, we write:

We have highlighted the commit with the comment "added hello world..." Its unique identifier is 6c44e53d06228f888f2f454d3cb8c1c976dd73f8. We want to create a "development" branch that starts from this commit. To do this, we write:
A branch is created with only the first two commits from the master branch. To verify this, we first make sure to switch to a different branch and look at the number of commits there:
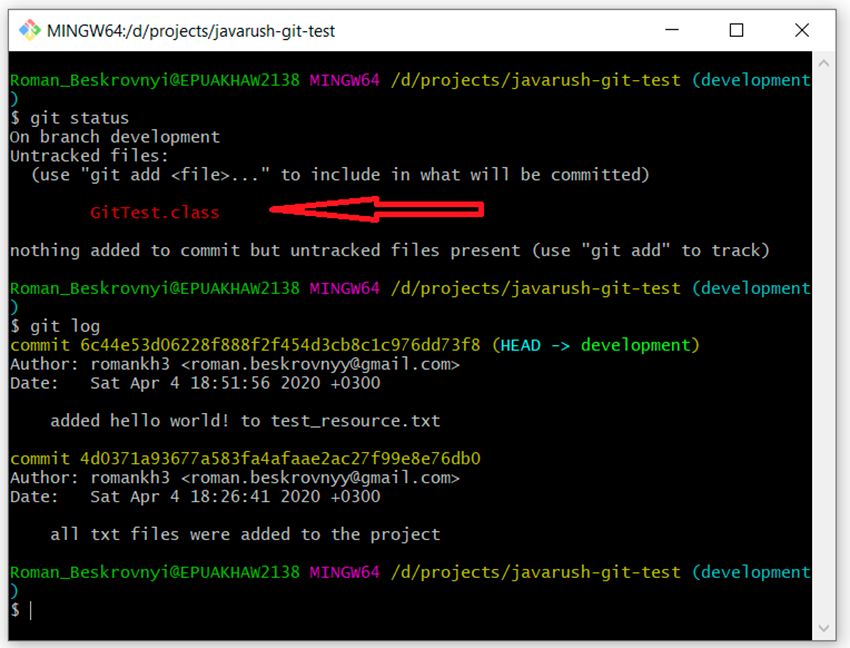
And as expected, we have two commits. By the way, here's an interesting point: there is no .gitignore file in this branch yet, so our compiled file (GitTest.class) is now highlighted with "untracked" status.
Now we can review our branches again by writing this:

You can see that there are two branches: "master" and "development". We are currently in development.
Let's create a branch based on the current one
The second way to create a branch is to create it from another. We want to create a branch based on the master branch. First, we need to switch to it, and the next step is to create a new one. Let's take a look:
- git checkout master — switch to the master branch
- git status — verify that we are actually in the master branch

Here you can see that we switched to the master branch, the .gitignore file is in effect, and the compiled class is no longer highlighted as "untracked".
Now we create a new branch based on the master branch:

If you are unsure whether this branch is the same as "master", you can easily check by executing "git log" and looking at all the commits. There should be four of them.
Conflict resolution
Before we explore what a conflict is, we need to talk about merging one branch into another.
This picture depicts the process of merging one branch into another:

Here, we have a main branch. At some point, a secondary branch is created off of the main branch and then modified. Once the work is done, we need to merge one branch into the other.
In our example, we created the feature/update-txt-files branch. As indicated by the name of the branch, we're updating text.

Now we need to create a new commit for this work:

Now, if we want to merge the feature/update-txt-files branch into master, we need to go to master and write "git merge feature/update-txt-files":

As a result, the master branch now also includes the commit that was added to feature/update-txt-files.
This functionality was added, so you can delete a feature branch. To do this, we write:
Let's complicate the situation: now let's say that you need to change the txt file again. But now this file will be changed in the master branch as well. In other words, it will change in parallel. Git will not be able to figure out what to do when we want to merge our new code into the master branch.
We'll create a new branch based on master, make changes to text_resource.txt, and create a commit for this work:
... we make changes to the file


Go to the master branch and also update this text file on the same line as in the feature branch:
… we updated test_resource.txt

And now the most interesting point: we need to merge changes from the feature/add-header branch to master. We are in the master branch, so we only need to write:
But the result will be a conflict in the test_resource.txt file:

Here we can see that Git could not decide on its own how to merge this code. It tells us that we need to resolve the conflict first, and only then perform the commit.
OK. We open the file with the conflict in a text editor and see:

To understand what Git did here, we need to remember which changes we made and where, and then compare:
- The changes that were on this line in the master branch are found between "<<<<<<< HEAD" and "=======".
- The changes that were in the feature/add-header branch are found between "=======" and ">>>>>>> feature/add-header".
This is how Git tells us that it could not figure out how to perform the merge at this location in the file. It divided this section into two parts from the different branches and invites us to resolve the merge conflict ourselves.
Fair enough. I boldly decide to remove everything, leaving only the word "header":

Let's look at the status of the changes. The description will be slightly different. Rather than a "modified" status, we have "unmerged". So could we have mentioned a fifth status? I don't think this is necessary. Let's see:

We can convince ourselves that this is a special, unusual case. Let's continue:

You may notice that the description suggest writing only "git commit". Let's try writing that:

And just like that, we did it — we resolved the conflict in the console.
Of course, this can be done a little easier in integrated development environments. For example, in IntelliJ IDEA, everything is set up so well that you can perform all the necessary actions right within it. But IDEs do a lot of things "under the hood", and we often don't understand what exactly is happening there. And when there is no understanding, problems can arise.
Working with remote repositories
The last step is to figure out a few more commands that are needed to work with the remote repository.
As I said, a remote repository is some place where the repository is stored and from which you can clone it.
What kind of remote repositories are there? Examples:
- GitHub is the largest storage platform for repositories and collaborative development.
- GitLab is a web-based tool for the DevOps lifecycle with open source. It is a Git-based system for managing code repositories with its own wiki, bug tracking system, CI/CD pipeline, and other functions.
- BitBucket is a web service for project hosting and collaborative development based on the Mercurial and Git version control systems. At one time it had a big advantage over GitHub in that it offered free private repositories. Last year, GitHub also introduced this capability to everyone for free.
- And so on…
When working with a remote repository, the first thing to do is clone the project to your local repository.
For this, we exported the project that we made locally Now everyone can clone it for themselves by writing:
There is now a complete local copy of the project. To be sure that the local copy of the project is the latest, you need to pull the project by writing:

In our case, nothing in the remote repository has changed at present, so the response is: Already up to date.
But if we make any changes to the remote repository, the local one is updated after we pull them.
And finally, the last command is to push the data to the remote repository. When we have done something locally and want to send it to the remote repository, we must first create a new commit locally. To demonstrate this, let's add something else to our text file:

Now something quite common for us — we create a commit for this work:
The command to push this to the remote repository is:
That's it for now!
| Useful links |
|---|
|
2. How to work with Git in IntelliJ IDEA
In this part, you will learn how to work with Git in IntelliJ IDEA.
Required inputs:
- Read, follow along, and understand the previous part. This will help ensure that everything is set up and ready to go.
- Install IntelliJ IDEA. Everything should be in order here :)
- Allocate an hour to achieve complete mastery.
Let's work with the demo project that I used for the article about Git.
Clone the project locally
There are two options here:
- If you already have a GitHub account and want to push something later, it is better to fork the project and clone your own copy. You can read about how to create a fork in another article under the heading An example of the forking workflow.
- Clone the repository and do everything locally without the ability to push the whole thing to the server.
To clone a project from GitHub, you need to copy the project link and pass it to IntelliJ IDEA:
Copy the project address:
![]()
Open IntelliJ IDEA and select "Get from Version Control":
![]()
Copy and paste the project address:
![]()
You will be prompted to create an IntelliJ IDEA project. Accept the offer:
![]()
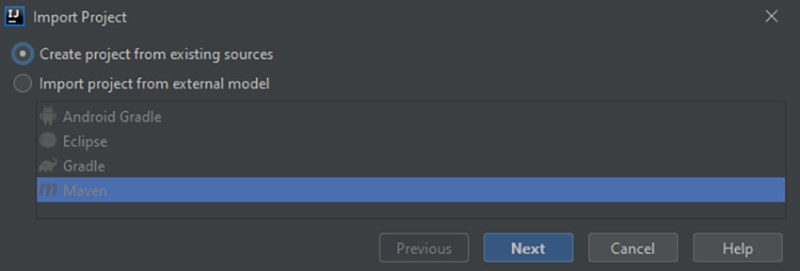
Since there is no build system, we select "Create project from existing sources":
![]()
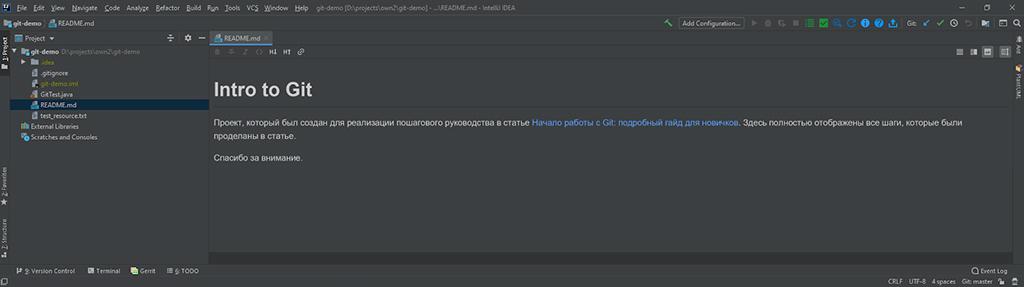
Next you'll see this beautiful screen:
![]()


Now that we figured out cloning, you can take a look around.
First glance at IntelliJ IDEA as a Git UI
Take a closer look at the cloned project: you can already get a lot of information about the version control system.
First, we have the Version Control pane in the lower left corner. Here you can find all local changes and get a list of commits (analogous to "git log").
Let's move on to a discussion of Log. There is a certain visualization that helps us understand exactly how development has proceeded. For example, you can see that a new branch was created with a added header to txt commit, which was then merged into the master branch. If you click on a commit, you can see in the right corner all the information about the commit: all its changes and metadata.

Moreover, you can see the actual changes. We also see that a conflict was resolved there. IDEA also presents this very well.
If you double-click on the file that was changed during this commit, we will see how the conflict was resolved:
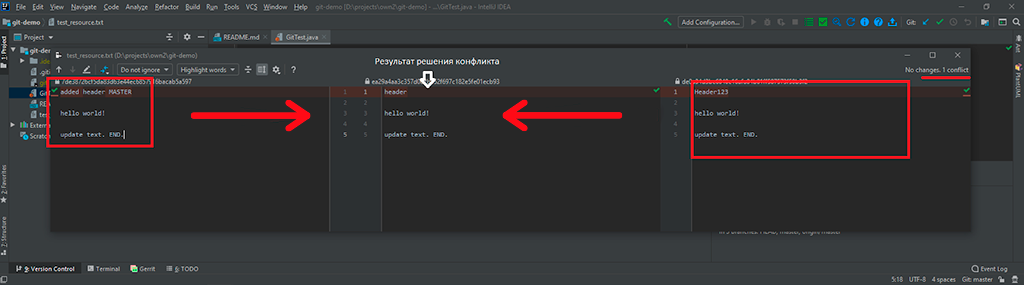
We note that on the left and the right we have the two versions of the same file that needed to be merged into one. And in the middle, we have the final merged result.
When a project has many branches, commits, and users, you need to search separately by branch, user, and date:

Before getting started, it is also worthwhile to explain how to understand which branch we are in.
In the lower right corner, there is a button labeled "Git: master". Whatever follows "Git:" is the current branch. If you click the button, you can do a lot of useful things: switch to another branch, create a new one, rename an existing one, and so on.

Working with a repository
Useful hotkeys
For future work, you need to remember a few very useful hotkeys:
- CTRL+T — Get the latest changes from the remote repository (git pull).
- CTRL+K — Create a commit / see all the current changes. This includes both untracked and modified files (git commit).
- CTRL+SHIFT+K — This is the command for pushing changes to the remote repository. All commits created locally and not yet in the remote repository will be pushed (git push).
- ALT+CTRL+Z — Rollback changes in a specific file to the state of the last commit created in the local repository. If you select the entire project in the upper left corner, you can roll back changes in all files.
What do we want?
To get work done, we need to master a basic scenario that is used everywhere.
The objective is to implement new functionality in a separate branch and then push it to a remote repository (then you also need to create a pull request to the main branch, but that's beyond the scope of this lesson).
What is required to do this?
Get all the current changes in the main branch (for example, "master").
From this main branch, create a separate branch for your work.
Implement the new functionality.
Go to the main branch and check if there have been any new changes while we were working. If not, then everything is fine. But if there were changes, then we do the following: go to the working branch and rebase the changes from the main branch to ours. If everything goes well, then great. But it's entirely possible that there will be conflicts. As it happens, they just can be resolved in advance, without wasting time in the remote repository.
Are you wondering why you should do this? It's good manners and prevents conflicts from occurring after pushing your branch to the local repository (there is, of course, a possibility that conflicts will still occur, but it becomes much smaller).
Push your changes to the remote repository.
How to get changes from the remote server?
We added a description to the README with a new commit and want to get these changes. If changes were made both in the local repository and in the remote one, then we are invited to choose between a merge and a rebase. We choose to merge.
Enter CTRL+T:

You can now see how the README has changed, i.e. the changes from the remote repository were pulled in, and in the lower right corner you can see all the details of the changes that came from the server.

Create a new branch based on master
Everything is simple here.
Go to the bottom right corner and click Git: master. Select + New Branch.
 Leave the Checkout branch checkbox selected and enter the name of the new branch. In our case: this will be readme-improver.
Git: master will then change to Git: readme-improver.
Let's simulate parallel work
For conflicts to appear, someone has to create them.
We will edit the README with a new commit through the browser, thus simulating parallel work. It's as if someone made changes in the same file while we were working on it. The result will be a conflict. We will remove the word "totally" from line 10.
Implement our functionality
Our task is to change the README and add a description to the new article. That is, the work in Git goes through IntelliJ IDEA. Add this:

The changes are done. Now we can create a commit. Press CTRL+K, which gives us:

Before creating a commit, we need to take a close look at what this window offers.
In the Commit Message section, we write text associated with the commit. Then to create it, we need to click Commit.
We write that the README has changed and create the commit. An alert pops up in the lower left corner with the name of the commit:

Check if the main branch has changed
We completed our task. It works. We wrote tests. Everything is fine. But before pushing to the server, we still need to check if there were any changes in the main branch in the meantime. How could that happen? Quite easily: someone receives a task after you, and that someone finishes it faster than you finish your task.
So we need to go to the master branch. To do this, we need to do what is shown in the lower right corner in the screenshot below:

In the master branch, press CTRL+T to get its latest changes from the remote server. Looking at what the changes, you can easily see what happened:

The word "totally" was removed. Maybe someone from marketing decided that it should not be written like that and gave the developers a task to update it.
We now have a local copy of the latest version of the master branch. Go back to readme-improver.
Now we need to rebase the changes from the master branch to ours. We do this: 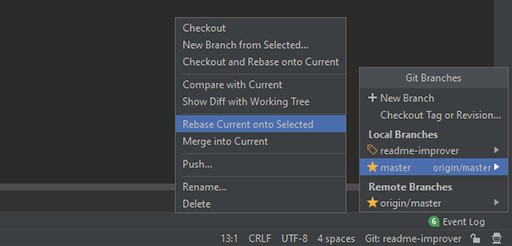
If you did everything correctly and followed along with me, the result should show a conflict in the README file:

Here we also have a lot of information to understand and soak up. Shown here is a list of files (in our case, one file) that have conflicts. We can choose from three options:
- accept yours — accept only changes from readme-improver.
- accept theirs — accept only changes from master.
- merge — choose yourself what you want to keep and what to discard.
It is not clear what changed. If there are changes are the master branch, they must be needed there, so we cannot simply accept our changes. Accordingly, we select merge: 
Here we can see that there are three parts:
- These are the changes from readme-improver.
- The merged result. For now, it is what existed before the changes.
- The changes from the master branch.
We need to produce a merged result that will satisfy everyone. Reviewing what was changed BEFORE our changes, we realize that they simply removed the word "totally". Okay, no problem! That means that we will also remove it in the merged result and then add our changes. Once we correct the merged result, we can click Apply.
Then a notification will pop up, telling us that the rebase was successful:

There! We resolved our first conflict through IntelliJ IDEA.
Push changes to the remote server
The next step is to push the changes to the remote server and create a pull request. To do this, simply press CTRL+SHIFT+K. Then we get:

On the left, there will be a list of commits that have not been pushed to the remote repository. On the right will be all the files that have changed. And that's it! Press Push and you will experience happiness :)
If the push is successful, you will see a notification like this in the lower right corner:

Bonus: creating a pull request
Let's go to a GitHub repository and we see that GitHub already knows what we want:

Click Compare & pull request. Then click Create pull request. Because we resolved the conflicts in advance, now when creating a pull request, we can immediately merge it: 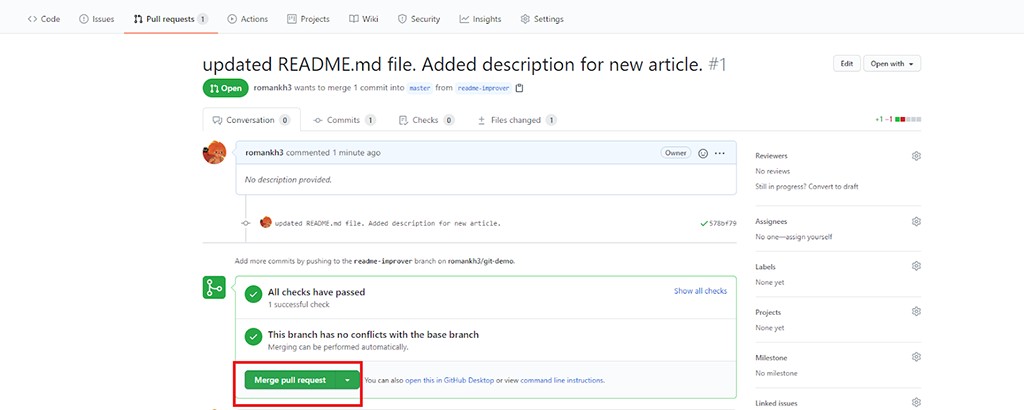
That's it for now!