Remember the project from the third module on the frontend, where it was necessary to implement an rpg admin panel for the server API? If anyone remembers, a map was used as storage on the server. Naturally, in real life, such storages are not used, but databases are used. The goal of this project will be to write an alternative repository layer implementation using Hibernate.
For this you need:
- Fork from a repository
- Download your version of the project to your computer.
- Add dependencies to pom.xml:
- mysql:mysql-connector-java:8.0.30
- org.hibernate: hibernate-core-jakarta: 5.6.11.Final
- Make a maven build (mvn clean install). For a change, we use Java version 1.8.
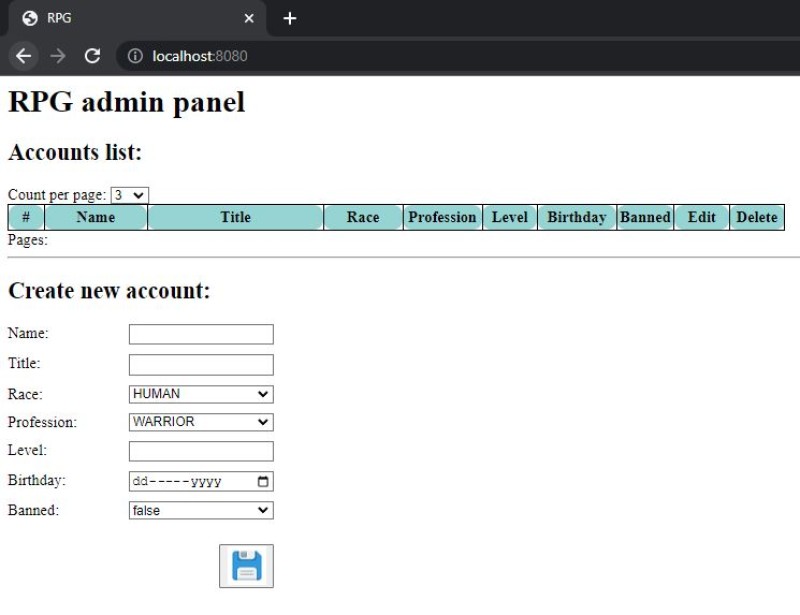
- Add launch configuration via Idea. The implementation of this item can be found in the lecture https://codegym.cc/quests/lectures/cgu.module3.lecture02 (item 4). The only difference is a different name for the artifact. If you did everything right and launched the application, you will see something like this:
![]()
- Run the rpg schema creation script in Workbench:
CREATE SCHEMA `rpg` ; - Optional . If you want to see what behavior is expected, you can change
com.game.service.PlayerServicethe annotation value from “db” to “memory” in the class in the constructor parameter . In this case, Spring will use the . After the test, don't forget to change the annotation value back to "db" .@QualifierIPlayerRepositoryPlayerRepositoryMemory@Qualifier - Arrange all the necessary annotations in the entity class
com.game.entity.Player. The table should be named "player", schema "rpg". For enams, use@Enumerated(EnumType.ORDINAL)in addition to the annotation@Column. Let me remind you that the length of the name field should be up to 12 characters, the title field - up to 30 characters. Absolutely all fields must not be null. PlayerRepositoryDBAdd a private final field in the classSessionFactory sessionFactory, initialize this field in the class constructor. Use properties as in normal tasks (we will work with the MySQL database version 8). From interesting - add
This will allow you not to create a table manually (or through the execution of a sql script).properties.put(Environment.HBM2DDL_AUTO, "update");- Implement all class methods. For a change, let's do this:
- Implement the method
getAllviaNativeQuery - Implement the method
getAllCountviaNamedQuery - In the method
beforeStop, call the ysessionFactorymethodclose. By having an annotation on the method@PreDestroy, Spring will call this method before stopping the application, and this will allow you to validly release all system resources. - The implementation of other methods is up to you. But do not forget about transactions and commits for methods that somehow change the contents of the database.
- Launch the application. If you did everything right, you will get a working application. But there is no data there, so run the init.sql script (from resources) through the Workbench so that they appear. After that, press F5 in the browser and check that you have implemented all the methods correctly.
- It would be interesting to see exactly what queries Hibernate executes, so let's add query logging. To do this, add the p6spy:p6spy:3.9.1 dependency to pom.xml . In the resources folder, create a file spy.properties , in which specify:
And in the constructor of the PlayerRepositoryDB class, change two options:driverlist=com.mysql.cj.jdbc.Driver dateformat=yyyy-MM-dd hh:mm:ss a appender=com.p6spy.engine.spy.appender.StdoutLogger logMessageFormat=com.p6spy.engine.spy.appender.MultiLineFormat
Now in the server output for each request you will see 2 lines. The first is what statement is prepared, the second is the query with the inserted parameters.properties.put(Environment.DRIVER, "com.p6spy.engine.spy.P6SpyDriver"); properties.put(Environment.URL, "jdbc:p6spy:mysql://localhost:3306/rpg");![]()


That's all, the project is ready, congratulations!
In fact, working with Hibernate from Spring uses a different approach, which we will cover in the fifth module.
Project analysis.
GO TO FULL VERSION