Task: You need to make a UI for a CRUD backend using HTML, CSS, JS, jQuery. We will make an admin panel for managing online game accounts.
- Fork from the repository: https://github.com/CodeGymCC/project-frontend.git
- Download your version of the project to your computer.
- Download Tomcat: https://tomcat.apache.org/download-90.cgi . Important: Tomcat version 9 needs to be installed, not 10.
- Configure application launch via Idea: Alt + Shift + F9 -> Edit Configurations… -> Alt + insert -> tom (in the search bar) -> Local.
- After that, you need to click
CONFIGUREand indicate where the archive with Tomcat was downloaded and unpacked. - In the tab
Deployment: Alt + insert -> Artifact… -> rpg:war exploded -> OK. - In the
Application contextfield: leave only/(forward slash). - Press
APPLY. - Close the settings window.
- Launch the application. To do this: Alt + Shift + F9 -> (config name, I named it 'App') -> Run.
- After deploying the application, a new tab will open in the browser selected during configuration. Great, the server is configured, then you need to work with two files:
<project_dir>/src/main/webapp/html/my.html- here we will have markup and scripts.<project_dir>/src/main/webapp/css/my.css– here we will have styles. Everything about styles is up to you, there are no requirements for them.- In the markup ( my.html ) add a table (do not forget to give it an id) in which specify the names of the columns:
- #
- Name
- Title
- Race
- Profession
- Level
- Birthday
- Banned
- Add a
<script>tag pair - we will write functions here. - The first function should send a GET request to the URL
"/rest/players"- to get the list. The result must be added to the table from point 7 (this is where the table id comes in handy). If you did everything correctly, after restarting the server, a table with 4 lines will be displayed on your page. In the first line - the names of the columns, in the rest - the data that came from the server. - Now, it is desirable to add cell borders to the table, otherwise the information is generally unreadable.
- Now let's move on to paging. For this you need:
- Under the table, add a section, for example
<div>, which will contain the paging buttons. - Add a function that will send a GET request to the server that returns the total number of accounts on the server. URL:
"/rest/players/count". - Add a drop-down list for 3-4 numerical values, representing the number of accounts to show at a time. These values must be between 3 and 20 inclusive.
- In the method for displaying the list of accounts (p. 9), we will add the calculation of the number of pages that are needed for a given number of accounts per page, so that you can view all the accounts.
- In the function of showing the list of accounts, add a parameter that will be responsible for the number of the page to be shown. Correct the URL so that it passes "pageNumber" and "pageSize" as query parameters. Now, when changing the number per page in the drop-down list, the requested number of accounts should be displayed:
- Now let's highlight the current page number, otherwise it's inconvenient ...
- Let's add 2 more columns to the table: Edit and Delete. For each row, let's add icons that will be responsible for editing and deleting each entry. You can use either the pictures that are in
<project_dir>/src/main/webapp/img/, or use your own. - Write a function that will be responsible for deleting an account. To do this, send a DELETE request to the server at the URL
"/rest/players/{id}". Call this function when the basket image is clicked. After the call - do not forget to update the list of accounts on the current page. - Before deleting account with id=23
- After deleting the account with id=23. Notice how no buttons, except for the basket, were pressed.
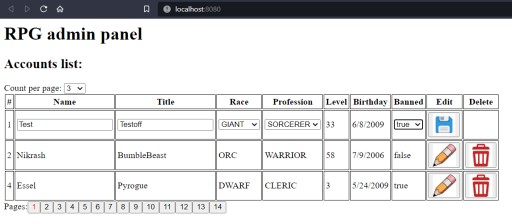
- Now write a function that is responsible for editing an account. When you click on it, let's hide the "Delete" button, and change the picture of the "Edit" button to "Save".
- Now let's add functionality for editing an account. By clicking on the “Edit” button, in addition to changing the picture, you need to make the fields editable:
- Name
- Title
- Race
- Profession
- Banned
- Now we will send the changes by clicking on the “Save” button. To do this, you need to send a POST request to the URL
“/rest/players/{id}”and pass the values of all five fields as the request body, which can be changed in the form of JSON. Use JSON.stringify({...}); After the change, don't forget to reload the data on the current page. - So, everything should be done from CRUD at the moment, except for “C” (Create). After the paging buttons, add a horizontal line and text stating that you can create a new account here. In addition, add blocks of text and input fields for account parameters:
- Name - text, from 1 to 12 characters.
- Title - text, from 1 to 30 characters.
- Race - drop-down list, see API for valid values.
- Profession - drop-down list, see API for valid values.
- Level is a number from 0 to 100.
- Birthday - date (from 2000-01-01 to 3000-12-31).
- Banned is a boolean value.
- Now add a button, on click on which all the entered data will be sent to the server. Use a POST request to the URL
/rest/players. After the server response, do not forget to clear the data entry fields and re-request the list of accounts on the current page. - Now you can add "beauty" through styles - everything here is up to you. I got this:


Please note that the value in the edit fields must be those that are in the account.


Useful: Server API:
Get playerslist
| URL | /rest/players |
| Method | Optional: Integer pageNumber, Integer pageSize |
| Data Params | None |
| Success Response |
|
| Notes |
pageNumber - a parameter that is responsible for the number of the displayed page when using paging. The numbering starts from zero. pageSize - a parameter that is responsible for the number of results on one page when paging |
Get players count
| URL | /rest/players/count |
| Method | GET |
| URL Params | None |
| Data Params | None |
| Success Response |
Code : 200 OK Content : Integer |
| Notes |
Delete player
| URL | /rest/players/{id} |
| Method | DELETE |
| URL Params | id |
| Data Params | None |
| Success Response | Code : 200 OK |
| Notes |
If the player is not found, the response is an error with the 404 code. If the id value is not valid, the response will be an error with a 400 code. |
Update player
| URL | /rest/players/{id} |
| Method | POST |
| URL Params | id |
| Data Params |
|
| Success Response |
|
| Notes |
Only fields that are not null are updated. If the player is not found in the database, the response is an error with the 404 code. If the id value is not valid, the response is an error with a 400 code. |
Create player
| URL | /rest/players |
| Method | POST |
| URL Params | None |
| Data Params |
|
| Success Response |
|
| Notes |
We cannot create a player if:
In the case of all of the above, the response is an error with a 400 code. |
Project analysis . Watch after completion!
GO TO FULL VERSION