1. The history of the IDE, popular IDEs for Java
The history of the IDE begins from the moment when programmers came up with the idea of combining 4 of the most commonly used software development tools:
- Text editor
- Compiler (or interpreter, depending on the language)
- Build automation tools
- Debugger
A lot of water has flowed under the bridge since then. Today it is hard to imagine IDEs without features such as:
- Class browser: a tool for easily navigating through thousands of classes in a project
- Integration with version control systems
- Tools for designing a graphical user interface without writing code
- Powerful tools for refactoring (changing code without adding any new features)
- Code style analysis and enforcement
- Super powerful debuggers that let you debug programs even remotely
- Code analyzers and all kinds of helpful autocompletions/prompts/hints
There are many different IDEs for Java developers today. Three of them stand out because they are most popular:
- IntelliJ IDEA
- Eclipse
- NetBeans
Many programmers are still caught up in the long-term war between Eclipse and IntelliJ IDEA, but by now it is obvious to everyone that IDEA has won. And you will understand why as soon as you use it for even a few days.
2. Flavors of IntelliJ IDEA
JetBrains releases IntelliJ IDEA updates four times a year. An IDEA version number consists of a year number and number that corresponds to the specific release in the year. For example, version 2018.2 is the second release of 2018, and 2019.3 is the third release of 2019. It is difficult to get confused.

Each release has two versions of IntelliJ IDEA: free and paid.
IntelliJ IDEA Community Edition
The free version is called IntelliJ IDEA Community Edition. It has everything you need for learning on CodeGym. So feel free to download it, install it, take off. You can download it here.
IntelliJ IDEA Ultimate Edition
The paid version is called IntelliJ IDEA Ultimate Edition. It has strong support for plenty of professional frameworks such as Spring, Hibernate, GWT, etc. At best, you will need these things at the very end of your CodeGym studies.
IntelliJ IDEA Ultimate Edition has a 30-day free trial, but then you will have to shell out a tidy sum for it.
If you want to use the paid version for free, there is a completely legitimate way to do this. It is called the Early Access Program (EAP).
IntelliJ IDEA EAP
With the release of each version of IDEA, there is a risk that some innovations won't work correctly or might even break some things that previously worked. That's why JetBrains lets developers download a non-released version of IntelliJ IDEA Ultimate Edition and test it on real projects.
On the one hand, there is a risk that this version will be rough around the edges. On the other hand, you get access to the latest IDEA features even before they are officially released. And for free. Isn't that cool?
3. Installing IDEA

Choose whichever version of IntelliJ IDEA you want on the https://www.jetbrains.com/idea/download/" target="_blank">official IntelliJ IDEA webpage. I hope you've already decided which one you prefer. If you're having trouble deciding, I recommend the Community Edition: it's simple and user-friendly.
There are versions of IDEA for Windows, MacOSX, and Linux. This is no surprise, since developers are very fond of these last two operating systems. As you gain experience, you'll also be amazed at how easy it is to manage various programs and services from the console/terminal.
STEP 1. Go to the JetBrains website and select IntelliJ IDEA Community Edition (it's free).

STEP 2. Download the file, open it, and click Next.

STEP 3. Leave the default installation path (otherwise, remember exactly where you install IDEA).

STEP 4. The installer will offer to create a shortcut and set file associations. Accept the desktop shortcut and set a file association with the .java file extension

STEP 5. Click Install.

STEP 6. Installation.

STEP 7. Start IntelliJ IDEA

STEP 8. When you start IntelliJ IDEA for the first time, a dialog box will appear asking you to specify the path to the settings file. Since this is your first experience with the IDE, select the "Do not import settings" option.

STEP 9. Anonymized sharing of information with JetBrains about the functions and plugins you use. You can select any option.

STEP 10. License agreement.

STEP 11. The next step in configuring IntelliJ IDEA is to choose a theme. There are two built-in theme: standard (light) and Darcula (dark).

STEP 12. Now you're done installing and configuring IntelliJ IDEA, and you can get started. In the next lesson, we'll describe how to create your first project.

If you still have questions, perhaps the official instructions for installing IntelliJ IDEA may be helpful.
4. Video instructions on the installation process
Next, simply run the downloaded installer to install IDEA. We made a special video to make this process as easy as possible for you.
Having trouble installing? Write to support at support@codegym.cc or use the widget in the lower right corner of the page of our site. Including a description of the problem, screenshots, and OS version will be super helpful.
5. Creating your first project
To write your first program in IDEA, you need to do 3 things:
- Create a new project
- Create a Solution class where you will write your code
- Run the program.
Step-by-step instructions for creating a project
STEP 1. To create a project, click "New Project".

STEP 2. Select the type of Java project.
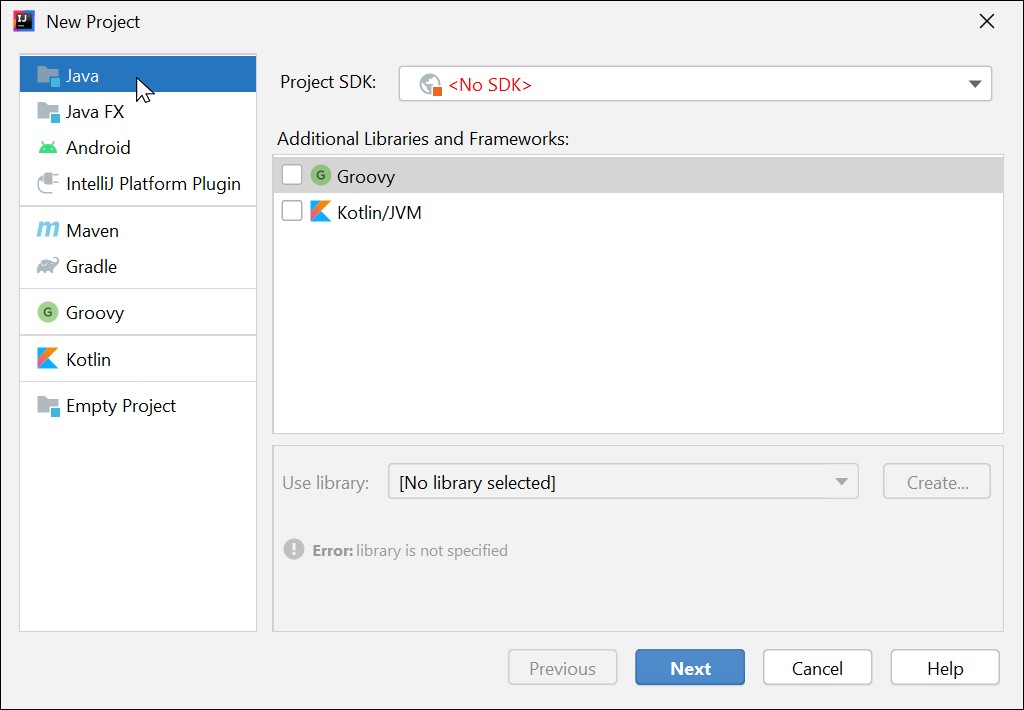
STEP 3. Add the JDK that the project will use. This is important: IDEA will not work without it. Select the folder with the JDK and click Next.(Your JDK version may be different)

STEP 4. Here you can specify a template that IntelliJ IDEA will use to create the project. You don't have to choose anything right now.

STEP 5. Everything is almost done. Specify the project name and click Finish.

STEP 6. You're done: the project is created. Now you can create classes in the src folder.

STEP 7. In the src folder, right click and create a new package.

STEP 8. Enter the package name for the classes you will create.

STEP 9. Now create a new class to hold your code. Right-click on the package name.

STEP 10. Enter the name of the new class. For example, Solution.

STEP 11. IntelliJ IDEA creates a class template for you. You can start writing your code in it.

STEP 12. First, create a main method. Type psvm and press the TAB key.

STEP 13. Now display "Hello, World!" on the screen (sout + TAB).

STEP 14. Run the program: right-click on the program code and select Run or press Ctrl+Shift+F10.

STEP 15. Your program displayed some text: you can see it in the panel below. Service information is displayed in blue.

Video on how to create a project in IDEA
6. Plugins for IntelliJ IDEA
IntelliJ IDEA has a variety of plugins that make various aspects of a programmer's job easier. But we are mainly interested in the ones that will help us learn.
There is just a great IntelliJ IDEA plugin called Key Promoter X. It tells you how various complex actions you perform in IDEA can be performed with a single hotkey combination. Add it — you won't regret it.
First, go to the plugins section. To do this, press Ctrl+Alt+S. Then type "Key Promoter X" in the search bar and install the plugin:

Congratulations, you are now one step closer to being a developer!
GO TO FULL VERSION