Good day, y'all!
Developers have a basic 'authoring' tool, that is, a development environment like
Eclipse,
NetBeans, etc. But without a doubt, the most popular environment at the moment
IntelliJ IDEA. It is designed to supercharge your coding abilities, greatly simplifying the process many times over.
![10 useful plugins for IntelliJ IDEA: for beginners and experienced developers - 1]()
But perhaps the functionality provided by this environment won't be adequate for everyone, or perhaps some people will want to customize it. The reality is that all you have to do is expand its functionality by adding plugins.
| Plugins are a way to add functionality to the main program. They are designed to expand its capabilities. |
Today we will look at 10 interesting plugins for working in IntelliJ IDEA. They will help you in your work, or at least cheer you up =)
First, let's run you through
boot camp for installing plugins in IntelliJ IDEA, using the installation of a new theme as an example.
1. IntelliJ IDEA themes
Have you ever felt that the limited set of built-in IntelliJ IDEA themes was somehow lacking? Perhaps you wanted to choose something else. Maybe you want to dig around and find something that fits you just right? Well, let's do it!
To get started, go
here and choose a theme (or theme pack) that suits you. For example, I chose
Gradianto.
Next, we have two ways to install the plugin.
Method 1: Install directly from the JetBrains website
You must have IDEA open. After choosing a theme, click on the
Get -> Install button. Then you will prompted to choose the version of IntelliJ IDEA that you have installed on your computer:
![10 useful plugins for IntelliJ IDEA: for beginners and experienced developers - 2]() ↓
↓![10 useful plugins for IntelliJ IDEA: for beginners and experienced developers - 3]()
Next, the following window will pop up in your development environment:
![10 useful plugins for IntelliJ IDEA: for beginners and experienced developers - 4]()
Click
OK. The plugin is installed!
Next, you sometimes need to restart
IntelliJ IDEA for the plugin to start working. For the plugin with themes, this wasn't necessary — the theme immediately changed to green:
![10 useful plugins for IntelliJ IDEA: for beginners and experienced developers - 5]()
Method 2: Installing from IntelliJ IDEA
In IDEA, in the upper left corner, go to
File -> Settings:
![10 useful plugins for IntelliJ IDEA: for beginners and experienced developers - 6]()
Next, go to the
Plugins tab and type the name of the plugin (
Gradianto) in the search bar, even partially:
![10 useful plugins for IntelliJ IDEA: for beginners and experienced developers - 7]()
Click the green
Install button and you're done!
Changing the theme
Green is not the only new theme. To see the rest:
- go back to File -> Settings
- open the "Appearance" tab
After that, click on the
Theme drop-down list and see four new available themes:
![10 useful plugins for IntelliJ IDEA: for beginners and experienced developers - 8]()
I liked the
Gradianto Deep Ocean theme the most:
![10 useful plugins for IntelliJ IDEA: for beginners and experienced developers - 9]()
Disabling / uninstalling a plugin
Let's see how to disable or entirely uninstall a plugin:
- again, open the Settings -> Plugins window
- select the Installed tab
Press
Disable to make the plugin inactive:
![10 useful plugins for IntelliJ IDEA: for beginners and experienced developers - 10]()
If you now click the arrows next to
Enable/Disable, then you will see a window lets you remove the plugin from your
IDEA:
![10 useful plugins for IntelliJ IDEA: for beginners and experienced developers - 11]()
As you can see, everything is actually quite simple :)
Well then, let's look at a few IDEA plugins that can be very useful.
2. String Manipulation
Here's a plugin that will add many new string handling capabilities to your IDEA. You can find it
here.
Once you install and restart the development environment, if you right click, for example, on the name of the variable or a selection of some text, you will notice a new
String Manipulation context menu item, which provides many possibilities for changing the selected string:
![10 useful plugins for IntelliJ IDEA: for beginners and experienced developers - 12]()
This plugin will be most useful when you need to interact with some very large text. It allows you to filter, sort, change case, change coding style (for example, changing all the text to camelCase), change something in all lines of the text in a single operation (ooo, that sounds intriguing), encode the text in some format (for example, in SHA-1 hexadecimal format), and much more.
Yes, at first it will seem like there are too many different functions, and it won't be entirely clear what this or that does. But over time, you will get used to and become a text-formatting god in IntelliJ IDEA.
3. IDE Features Trainer
This plugin is intended primarily for beginners. It interactively helps you learn basic shortcuts and functions in the IDE.
You can think of it like your very own personal drill sergeant in IntelliJ IDEA.
You can find it here
here.
After installation, go to the
Help -> IDE Features Trainer section.
![10 useful plugins for IntelliJ IDEA: for beginners and experienced developers - 13]()
Next, choose a topic that you would like to learn more about. For example, refactoring:
![10 useful plugins for IntelliJ IDEA: for beginners and experienced developers - 14]()
And then start completing step-by-step exercises.
4. Key Promoter X
I've noticed that the more experienced and skillful the programmer, the more hotkeys he or she knows.
After all, instead of manually searching through the code or manually doing something, you can press a couple of keyboard shortcuts and voila, you're done! As a result, you will work much faster.
So, allow me to introduce you to the
Key Promoter X plugin. After loading it, when we go to some settings window, menu, or tab, we will see in the lower right corner a prompt with the keyboard shortcut that could have performed the same action (i.e. would have opened the same settings window, menu, etc.):
![10 useful plugins for IntelliJ IDEA: for beginners and experienced developers - 15]()
When you add this to a run through the
IDE Features Trainer tutorials, you will be able to work in IDEA without actually using the mouse (which will speed up your work many times over).
5. Rainbow Brackets and HighlightBracketPair
I couldn't fail to mention the
Rainbow Brackets plugin. Once installed, it makes coding much more convenient, because pairs of brackets become multi-colored:
![10 useful plugins for IntelliJ IDEA: for beginners and experienced developers - 16]()
This lets you see at once which opening parenthesis is paired with which closing one.
The colors are not arbitrary (not chosen at random). There is a certain logic: brackets at the same degree of nesting will have the same color. For example, brackets inside of yellow ones will be green. And in green brackets, everything will be blue, and so on...
Speaking of brackets, let's move on to
HighlightBracketPair. When using this plugin, you will clearly see the particular block of code or parentheses your cursor is in, since the relevant pair of parentheses will be highlighted:
![10 useful plugins for IntelliJ IDEA: for beginners and experienced developers - 17]()
These two tools can be very useful if you are working on code that is heavily nested.
6. Codota AI
In the distant, distant past, code was routinely written in an ordinary text editor. And now imagine that you've forgotten a parenthesis somewhere, well, or made a mistake in the name of a class. Nothing will compile! As a result, in those days you had to spend hours hunting down the error and be extremely careful when writing code. That sort of suffering is only for people with the strongest nerves.
I think this became annoying enough that some folks started to create various environments for working with code. IntelliJ IDEA, Eclipse, NetBeans...
And now here you are, working in IntelliJ IDEA, which is very smart and provides unbelievable help in coding, suggesting locations of possible errors and pulling up relevant names of classes and methods as soon as you start typing them.
How about making it a little smarter? For this, you can use the
Codota AI plugin. This plugin is designed to provide better autocompletion of code thanks to AI.
Based on millions of open source Java programs as well as your context,
Codota uses the most advanced machine learning models to help autocomplete lines of code, helping you write code much faster and with fewer errors.
In other words, this plugin lets IDEA prompt you based on the context of your application. For example, it can show the accessible, visible variables of the required type:
![10 useful plugins for IntelliJ IDEA: for beginners and experienced developers - 18]()
You can also select a particular block of code, for example, a method name, and try to search for ready-made examples:
![10 useful plugins for IntelliJ IDEA: for beginners and experienced developers - 19]()
7. SpotBugs
Speaking of coding assistants, I think it wouldn't hurt to have one that helps catch bugs, right?
This is where the
SpotBugs plugin enters the stages.
SpotBugs performs static analysis of bytecode to find bugs in Java code within IntelliJ IDEA. That is, this plugin is a great tool for detecting certain Java bugs, and it does so by analyzing your code and comparing it against 400+ bug patterns and poor solutions. Such errors include infinite recursive loops,
deadlock,
livelock, and incorrect use of various libraries.
SpotBugs can identify hundreds of serious bugs in large applications (there is usually roughly one bug in 1000–2000 lines of uncommented source code).
After installing the plugin, in the menu, select
Analyze -> SpotBugs -> <target of analysis>. The target can be either one file or a whole module, including or not including associated tests:
![10 useful plugins for IntelliJ IDEA: for beginners and experienced developers - 20]()
After the analysis is done, at the bottom you can see a window indicating all the found bugs or poor solutions along with suggestions for fixing them:
![10 useful plugins for IntelliJ IDEA: for beginners and experienced developers - 21]()
8. Maven Helper
The
Maven Helper plugin is a must-have for anyone using Maven.
It adds an easy way to analyze and eliminate conflicting dependencies, as well as the ability to see Maven dependencies in various views (as a list or a tree).
To run the analysis, open the
pom file and click the
Dependency Analyzer tab at the bottom. Then you will be able to see which dependencies conflict with which and exclude any conflicting ones:
![10 useful plugins for IntelliJ IDEA: for beginners and experienced developers - 22]()
The plugin also adds additional features for running / debugging individual files or the root module:
![10 useful plugins for IntelliJ IDEA: for beginners and experienced developers - 23]()
Enabling this dependency manager will save you time when solving problems with dependencies.
9. Scratch
When writing code, you'll often think "this will need to be fixed before I commit it", you'll need to write temporary data somewhere for your own reference or for some test, or you'll want to record notes or the data seen when debugging your application.
This generally means quickly launching a new instance of Notepad, but that still isn't very good. How can we better make use of the tools offered by our beloved IntelliJ IDEA?
For example, the
Scratch plugin.
This plugin lets you create temporary text editor tabs in IDEA, where you can write code, store temporary data, or quickly jot down thoughts that you will need later, but don't need to save forever. Never again will your file system be littered with single-use TXT files.
After loading the plugin, press
Alt+C. A window appears, where you can specify a name for your text file:
![10 useful plugins for IntelliJ IDEA: for beginners and experienced developers - 24]()
After we click
OK, we get a tab with a temporary text file.
If a file was created previously, then this keyboard shortcut will open it. If there is already a long list of these tabs, the most recent one will be opened.
In the plugin description, you can see the rest of the hotkeys for using these temporary text files.
You can also access these temporary files from the menu:
Tools -> Scratch -> ...![10 useful plugins for IntelliJ IDEA: for beginners and experienced developers - 25]()
10. Progress Bar
And finally, some comic relief — I'd like to mention some funny little
progress bar plugins. These plugins change the progress bar's typical boring appearance to something more fun.
For example, I very much liked the
Mario plugin:
![10 useful plugins for IntelliJ IDEA: for beginners and experienced developers - 26]()
![10 useful plugins for IntelliJ IDEA: for beginners and experienced developers - 27]()
Or try a very popular plugin — the
Nyan Progress Bar.
![10 useful plugins for IntelliJ IDEA: for beginners and experienced developers - 28]()
I do need to point out to you that adding additional functionality can cause IDEA to consume far more resources, and an excessive plugin obsession may affect the performance of your development environment.
Therefore, when trying to put together your ideal set of plugins, do not get carried away: you need to try to maintain a "happy medium" between performance and additional functionality.
That's all for me today :)
Tell us about your favorite plugins in the comments.
 But perhaps the functionality provided by this environment won't be adequate for everyone, or perhaps some people will want to customize it. The reality is that all you have to do is expand its functionality by adding plugins.
 Next, the following window will pop up in your development environment:
 Click OK. The plugin is installed!
Next, you sometimes need to restart IntelliJ IDEA for the plugin to start working. For the plugin with themes, this wasn't necessary — the theme immediately changed to green:
Click OK. The plugin is installed!
Next, you sometimes need to restart IntelliJ IDEA for the plugin to start working. For the plugin with themes, this wasn't necessary — the theme immediately changed to green:
 Next, go to the Plugins tab and type the name of the plugin (Gradianto) in the search bar, even partially:
 Click the green Install button and you're done!
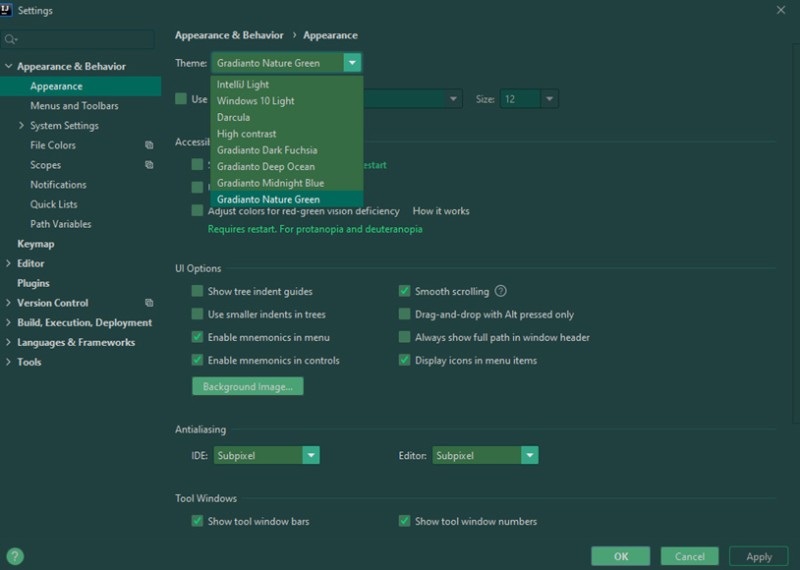 I liked the Gradianto Deep Ocean theme the most:

 If you now click the arrows next to Enable/Disable, then you will see a window lets you remove the plugin from your IDEA:
 As you can see, everything is actually quite simple :)
Well then, let's look at a few IDEA plugins that can be very useful.
As you can see, everything is actually quite simple :)
Well then, let's look at a few IDEA plugins that can be very useful. This plugin will be most useful when you need to interact with some very large text. It allows you to filter, sort, change case, change coding style (for example, changing all the text to camelCase), change something in all lines of the text in a single operation (ooo, that sounds intriguing), encode the text in some format (for example, in SHA-1 hexadecimal format), and much more.
Yes, at first it will seem like there are too many different functions, and it won't be entirely clear what this or that does. But over time, you will get used to and become a text-formatting god in IntelliJ IDEA.
This plugin will be most useful when you need to interact with some very large text. It allows you to filter, sort, change case, change coding style (for example, changing all the text to camelCase), change something in all lines of the text in a single operation (ooo, that sounds intriguing), encode the text in some format (for example, in SHA-1 hexadecimal format), and much more.
Yes, at first it will seem like there are too many different functions, and it won't be entirely clear what this or that does. But over time, you will get used to and become a text-formatting god in IntelliJ IDEA.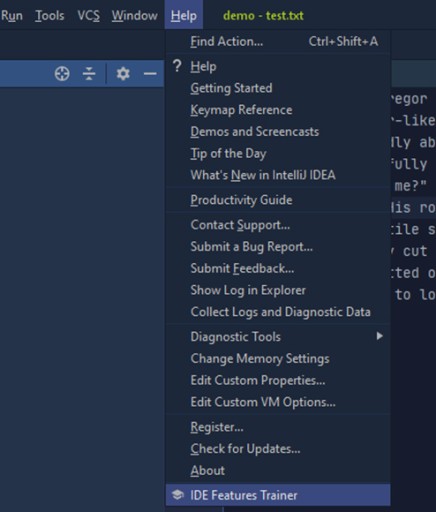 Next, choose a topic that you would like to learn more about. For example, refactoring:
 And then start completing step-by-step exercises.
 When you add this to a run through the IDE Features Trainer tutorials, you will be able to work in IDEA without actually using the mouse (which will speed up your work many times over).
 This lets you see at once which opening parenthesis is paired with which closing one.
The colors are not arbitrary (not chosen at random). There is a certain logic: brackets at the same degree of nesting will have the same color. For example, brackets inside of yellow ones will be green. And in green brackets, everything will be blue, and so on...
Speaking of brackets, let's move on to HighlightBracketPair. When using this plugin, you will clearly see the particular block of code or parentheses your cursor is in, since the relevant pair of parentheses will be highlighted:
This lets you see at once which opening parenthesis is paired with which closing one.
The colors are not arbitrary (not chosen at random). There is a certain logic: brackets at the same degree of nesting will have the same color. For example, brackets inside of yellow ones will be green. And in green brackets, everything will be blue, and so on...
Speaking of brackets, let's move on to HighlightBracketPair. When using this plugin, you will clearly see the particular block of code or parentheses your cursor is in, since the relevant pair of parentheses will be highlighted: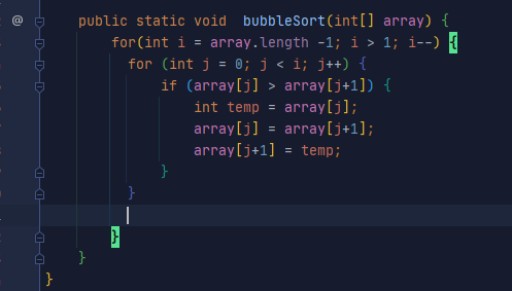 These two tools can be very useful if you are working on code that is heavily nested.
 You can also select a particular block of code, for example, a method name, and try to search for ready-made examples:
 After the analysis is done, at the bottom you can see a window indicating all the found bugs or poor solutions along with suggestions for fixing them:
 The plugin also adds additional features for running / debugging individual files or the root module:
 Enabling this dependency manager will save you time when solving problems with dependencies.

 After we click OK, we get a tab with a temporary text file.
If a file was created previously, then this keyboard shortcut will open it. If there is already a long list of these tabs, the most recent one will be opened.
In the plugin description, you can see the rest of the hotkeys for using these temporary text files.
You can also access these temporary files from the menu: Tools -> Scratch -> ...
After we click OK, we get a tab with a temporary text file.
If a file was created previously, then this keyboard shortcut will open it. If there is already a long list of these tabs, the most recent one will be opened.
In the plugin description, you can see the rest of the hotkeys for using these temporary text files.
You can also access these temporary files from the menu: Tools -> Scratch -> ...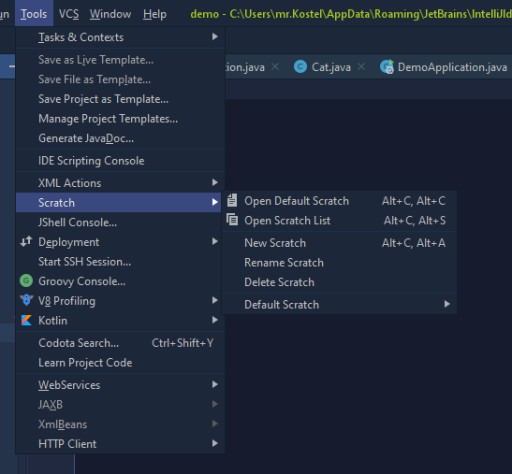

 Or try a very popular plugin — the Nyan Progress Bar.
 I do need to point out to you that adding additional functionality can cause IDEA to consume far more resources, and an excessive plugin obsession may affect the performance of your development environment.
Therefore, when trying to put together your ideal set of plugins, do not get carried away: you need to try to maintain a "happy medium" between performance and additional functionality.
That's all for me today :)
Tell us about your favorite plugins in the comments.
I do need to point out to you that adding additional functionality can cause IDEA to consume far more resources, and an excessive plugin obsession may affect the performance of your development environment.
Therefore, when trying to put together your ideal set of plugins, do not get carried away: you need to try to maintain a "happy medium" between performance and additional functionality.
That's all for me today :)
Tell us about your favorite plugins in the comments.
GO TO FULL VERSION