 วันนี้เราจะพูดถึงกราฟและอัลกอริธึมที่เกี่ยวข้องกัน กราฟเป็นหนึ่งในโครงสร้างที่ยืดหยุ่นและหลากหลายที่สุดในการเขียนโปรแกรม โดยปกติกราฟ G ถูกกำหนดโดยเซตคู่หนึ่ง เช่น G = (V, R) โดยที่:
- V คือเซตของจุดยอด
- R คือชุดของเส้นที่เชื่อมต่อคู่ของจุดยอด
 เส้นบอกทิศทางเรียกว่าส่วนโค้ง
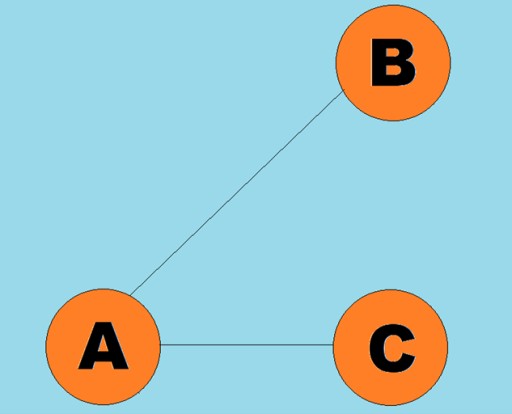
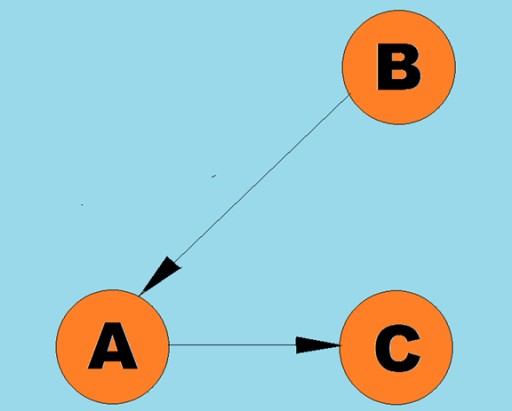 โดยทั่วไปแล้ว กราฟจะแสดงด้วยแผนภาพซึ่งจุดยอดบางจุดเชื่อมต่อกันด้วยขอบ (ส่วนโค้ง) กราฟที่มีขอบแสดงทิศทางการเคลื่อนที่เรียกว่ากราฟกำกับ หากกราฟเชื่อมต่อกันด้วยขอบที่ไม่ได้ระบุทิศทางการเคลื่อนที่ เราจะบอกว่ากราฟนั้นเป็นกราฟที่ไม่มีทิศทาง ซึ่งหมายความว่าการเคลื่อนที่เป็นไปได้ในทั้งสองทิศทาง: ทั้งจากจุดยอด A ไปยังจุดยอด B และจากจุดยอด B ไปยังจุดยอด A กราฟที่เชื่อมต่อกันคือกราฟซึ่งมีเส้นทางอย่างน้อยหนึ่งเส้นทางที่นำจากแต่ละจุดยอดไปยังจุดยอดอื่น ๆ (ดังเช่นใน ตัวอย่างข้างต้น) หากไม่เป็นเช่นนั้น กราฟจะขาดการเชื่อมต่อ:
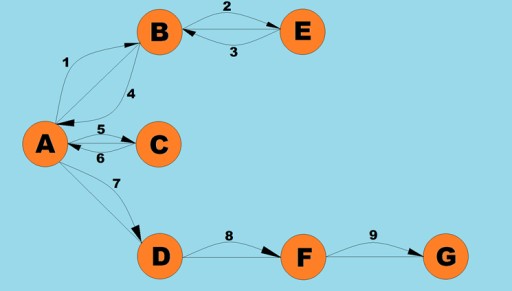
 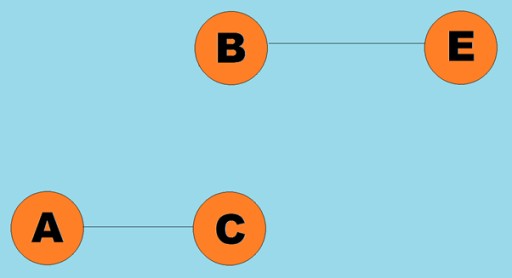 สามารถกำหนดน้ำหนักให้กับขอบ (ส่วนโค้ง) ได้ น้ำหนักคือตัวเลขที่แสดงถึงระยะห่างทางกายภาพระหว่างจุดยอดสองจุด (หรือเวลาการเดินทางสัมพัทธ์ระหว่างจุดยอดสองจุด) กราฟเหล่านี้เรียกว่ากราฟถ่วงน้ำหนัก:
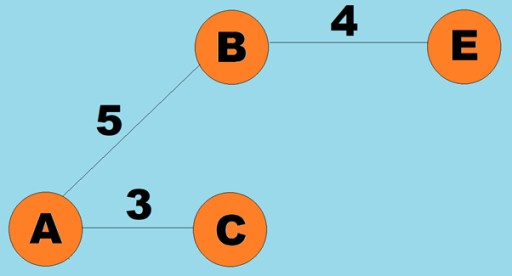
3. อัลกอริธึมการค้นหาเส้นทาง (เน้นเชิงลึก เน้นกว้างก่อน)
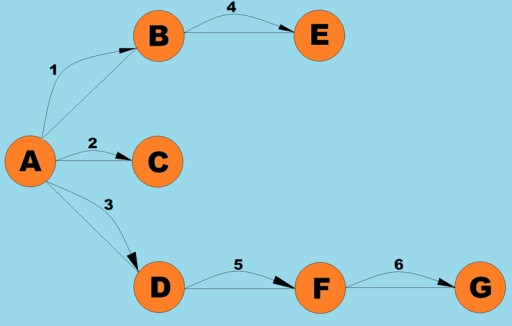
การดำเนินการพื้นฐานประการหนึ่งที่ดำเนินการกับกราฟคือการกำหนดจุดยอดทั้งหมดที่สามารถเข้าถึงได้จากจุดยอดที่กำหนด ลองนึกภาพว่าคุณกำลังพยายามพิจารณาว่าจะนั่งรถบัสจากเมืองหนึ่งไปยังอีกเมืองหนึ่งได้อย่างไร รวมถึงการเดินทางที่เป็นไปได้ด้วย บางเมืองสามารถเข้าถึงได้โดยตรง ในขณะที่บางเมืองสามารถเข้าถึงได้โดยผ่านเมืองอื่นเท่านั้น มีสถานการณ์อื่นๆ มากมายที่คุณอาจต้องค้นหาจุดยอดทั้งหมดที่คุณสามารถเข้าถึงได้จากจุดยอดที่กำหนด มีสองวิธีหลักในการสำรวจกราฟ: เชิงลึกมาก่อนและกว้างก่อน เราจะสำรวจทั้งสองสิ่งนี้ ทั้งสองวิธีจะสำรวจจุดยอดที่เชื่อมต่อกันทั้งหมด หากต้องการสำรวจอัลกอริธึมที่เน้นเชิงลึกและกว้างก่อนเพิ่มเติม เราจะใช้กราฟต่อไปนี้:
การค้นหาเชิงลึกก่อน
นี่เป็นหนึ่งในวิธีการข้ามกราฟที่ใช้กันทั่วไป กลยุทธ์ที่เน้นความลึกเป็นอันดับแรกคือการเจาะกราฟให้ลึกที่สุดเท่าที่จะเป็นไปได้ จากนั้นหลังจากถึงทางตันแล้ว เราจะกลับไปยังจุดยอดที่ใกล้ที่สุดซึ่งก่อนหน้านี้ไม่มีจุดยอดที่อยู่ติดกัน อัลกอริทึมนี้จัดเก็บข้อมูลบนสแต็กเกี่ยวกับตำแหน่งที่จะส่งคืนเมื่อถึงจุดสิ้นสุด กฎสำหรับการค้นหาเชิงลึกก่อน:- เยี่ยมชมจุดยอดที่อยู่ติดกันซึ่งไม่ได้เยี่ยมชมก่อนหน้านี้ ทำเครื่องหมายว่าเยี่ยมชมแล้ว และวางลงบนสแต็ก
- ย้ายไปที่จุดยอดนี้
- ทำซ้ำขั้นตอนที่ 1
- หากขั้นตอนที่ 1 เป็นไปไม่ได้ ให้กลับไปที่จุดยอดก่อนหน้าแล้วลองทำตามขั้นตอนที่ 1 หากเป็นไปไม่ได้ ให้กลับไปที่จุดยอดก่อนหน้านั้นและต่อไปเรื่อยๆ จนกว่าเราจะพบจุดยอดที่เราสามารถเดินทางต่อได้
- ทำต่อไปจนกว่าจุดยอดทั้งหมดจะอยู่บนสแต็ก
 มาดูกันว่าโค้ด Java สำหรับอัลกอริทึมนี้อาจมีลักษณะอย่างไร:
public class Graph {
  private final int MAX_VERTS = 10;
  private Vertex vertexArray[]; // Array of vertices
  private int adjMat[][]; // Adjacency matrix
  private int nVerts; // Current number of vertices
  private Stack stack;

  public Graph() { // Initialize internal fields
     vertexArray = new Vertex[MAX_VERTS];
     adjMat = new int[MAX_VERTS][MAX_VERTS];
     nVerts = 0;
     for (int j = 0; j < MAX_VERTS; j++) {
        for (int k = 0; k < MAX_VERTS; k++) {
           adjMat[j][k] = 0;
        }
     }
     stack = new Stack<>();
  }

  public void addVertex(char lab) {
     vertexArray[nVerts++] = new Vertex(lab);
  }

  public void addEdge(int start, int end) {
     adjMat[start][end] = 1;
     adjMat[end][start] = 1;
  }

  public void displayVertex(int v) {
     System.out.println(vertexArray[v].getLabel());
  }

  public void dfs() { // Depth-first search
     vertexArray[0].setVisited(true); // Take the first vertex
     displayVertex(0);
     stack.push(0);

     while (!stack.empty()) {
        int v = getAdjUnvisitedVertex(stack.peek()); // Return the index of the adjacent vertex: if any, 1; if not, -1
        if (v == -1) { // If there is no unvisited adjacent vertex
           stack.pop(); // The element is removed from the stack
        }
        else {
           vertexArray[v].setVisited(true);
           displayVertex(v);
           stack.push(v); // The element goes on top of the stack
        }
     }

     for (int j = 0; j < nVerts; j++) {  // Reset the flags
        vertexArray[j].visited = false;
     }

  }

  private int getAdjUnvisitedVertex(int v) {
     for (int j = 0; j < nVerts; j++) {
        if (adjMat[v][j] == 1 && vertexArray[j].visited == false) {
           return j; // Returns the first vertex found
        }
     }
     return -1;
  }
}
public class Vertex {
  private char label;  // for example, 'A'
  public boolean visited;

  public Vertex(final char label) {
     this.label = label;
     visited = false;
  }

  public char getLabel() {
     return this.label;
  }

  public boolean isVisited() {
     return this.visited;
  }

  public void setVisited(final boolean visited) {
     this.visited = visited;
  }
}public class Solution {
public static void main(String[] args) {
Graph graph = new Graph();
graph.addVertex('A'); //0
graph.addVertex('B'); //1
graph.addVertex('C'); //2
graph.addVertex('D'); //3
graph.addVertex('E'); //4
graph.addVertex('F'); //5
graph.addVertex('G'); //6
graph.addEdge(0,1);
graph.addEdge(0,2);
graph.addEdge(0,3);
graph.addEdge(1,4);
graph.addEdge(3,5);
graph.addEdge(5,6);
System.out.println("Visits: ");
graph.dfs();
}
}การค้นหาแบบกว้างก่อน
เช่นเดียวกับการค้นหาเชิงลึกก่อน อัลกอริธึมนี้เป็นหนึ่งในวิธีการสำรวจกราฟที่ง่ายและพื้นฐานที่สุด ประเด็นสำคัญคือเรามีจุดยอดปัจจุบันอยู่บ้าง เราใส่จุดยอดที่อยู่ติดกันที่ยังไม่ได้เยี่ยมชมทั้งหมดลงในคิวและเลือกองค์ประกอบถัดไป (ซึ่งเป็นจุดยอดที่เก็บไว้ที่ส่วนหัวของคิว) ซึ่งกลายเป็นจุดยอดปัจจุบัน... การแบ่งอัลกอริทึมนี้ออกเป็นขั้นตอน เราสามารถระบุขั้นตอนต่อไปนี้ได้:- เยี่ยมชมจุดยอดถัดไปที่ยังไม่ได้เยี่ยมชมซึ่งอยู่ติดกับจุดสุดยอดปัจจุบัน ทำเครื่องหมายว่าเยี่ยมชมแล้วล่วงหน้า และเพิ่มลงในคิว
- หากไม่สามารถดำเนินการขั้นตอน #1 ได้ ให้ลบจุดยอดออกจากคิวและทำให้เป็นจุดยอดปัจจุบัน
- หากไม่สามารถดำเนินการขั้นตอน #1 และ #2 ได้ แสดงว่าเราข้ามผ่านเสร็จแล้ว — ทุกจุดยอดถูกสำรวจแล้ว (หากเรามีกราฟที่เชื่อมโยงกัน)
 คลาสกราฟที่นี่เกือบจะเหมือนกันกับคลาสที่เราใช้สำหรับอัลกอริธึมการค้นหาเชิงลึกก่อน ยกเว้นวิธีการค้นหาเองและความจริงที่ว่าคิวจะแทนที่สแต็กภายใน:
public class Graph {
  private final int MAX_VERTS = 10;
  private Vertex vertexList[]; // Array of vertices
  private int adjMat[][]; // Adjacency matrix
  private int nVerts; // Current number of vertices
  private Queue queue;

  public Graph() {
     vertexList = new Vertex[MAX_VERTS];
     adjMat = new int[MAX_VERTS][MAX_VERTS];
     nVerts = 0;
     for (int j = 0; j < MAX_VERTS; j++) {
        for (int k = 0; k < MAX_VERTS; k++) {  // Fill the adjacency matrix with zeros
           adjMat[j][k] = 0;
        }
     }
     queue = new PriorityQueue<>();
  }

  public void addVertex(char lab) {
     vertexList[nVerts++] = new Vertex(lab);
  }

  public void addEdge(int start, int end) {
     adjMat[start][end] = 1;
     adjMat[end][start] = 1;
  }

  public void displayVertex(int v) {
     System.out.println(vertexList[v].getLabel());
  }

  public void bfc() { // Depth-first search
     vertexList[0].setVisited(true);
     displayVertex(0);
     queue.add(0);
     int v2;

     while (!queue.isEmpty()) {
        int v = queue.remove();

        while((v2 = getAdjUnvisitedVertex(v))!=-1) {// The loop runs until every adjacent vertex is found and added to the queue
           vertexList[v2].visited = true;
           displayVertex(v2);
           queue.add(v2);
        }
     }

     for (int j = 0; j < nVerts; j++) {  // Reset the flags
        vertexList[j].visited = false;
     }

  }

  private int getAdjUnvisitedVertex(int v) {
     for (int j = 0; j < nVerts; j++) {
        if (adjMat[v][j] == 1 && vertexList[j].visited == false) {
           return j; // Returns the first vertext found
        }
     }
     return -1;
  }
}public class Solution {
public static void main(String[] args) {
Graph graph = new Graph();
graph.addVertex('A'); //0
graph.addVertex('B'); //1
graph.addVertex('C'); //2
graph.addVertex('D'); //3
graph.addVertex('E'); //4
graph.addVertex('F'); //5
graph.addVertex('G'); //6
graph.addEdge(0,1);
graph.addEdge(0,2);
graph.addEdge(0,3);
graph.addEdge(1,4);
graph.addEdge(3,5);
graph.addEdge(5,6);
System.out.println("Visits: ");
graph.bfc();
}
}4. อัลกอริทึมของ Dijkstra
ตามที่กล่าวไว้ข้างต้น กราฟสามารถกำหนดทิศทางหรือไม่มีทิศทางได้ และคุณจะจำได้ว่าสามารถถ่วงน้ำหนักได้เช่นกัน ความสัมพันธ์ของแบบจำลองกราฟกำกับแบบถ่วงน้ำหนักที่มักพบในชีวิตจริง ตัวอย่างเช่น แผนที่เมืองที่เมืองต่างๆ เป็นจุดยอด และขอบระหว่างเมืองเหล่านั้นเป็นถนนที่มีการจราจรทางเดียวซึ่งไหลไปในทิศทางของขอบที่กำหนด สมมติว่าคุณเป็นบริษัทขนส่งสินค้า และคุณต้องค้นหาเส้นทางที่สั้นที่สุดระหว่างสองเมืองที่ห่างไกล คุณจะทำมันได้อย่างไร? การค้นหาเส้นทางที่สั้นที่สุดระหว่างจุดยอดสองจุดเป็นปัญหาที่พบบ่อยที่สุดปัญหาหนึ่งที่แก้ไขได้โดยใช้กราฟถ่วงน้ำหนัก เพื่อแก้ไขปัญหานี้ เราใช้อัลกอริทึมของ Dijkstra เมื่อคุณรันแล้ว คุณจะรู้เส้นทางที่สั้นที่สุดจากจุดยอดเริ่มต้นที่กำหนดไปยังจุดยอดอื่นๆ ขั้นตอนของอัลกอริทึมนี้มีอะไรบ้าง? ฉันจะพยายามตอบคำถามนี้ ขั้นตอนของอัลกอริทึมของ Dijkstra:- ขั้นตอนที่ 1: ค้นหาโหนดที่อยู่ติดกันซึ่งมีต้นทุนการนำทางต่ำที่สุด (น้ำหนักขอบต่ำสุด) คุณกำลังยืนอยู่ที่จุดเริ่มต้นและคิดว่าจะไปที่ไหน: ไปยังโหนด A หรือโหนด B การย้ายไปยังแต่ละโหนดเหล่านี้มีค่าใช้จ่ายเท่าไร
- ขั้นตอนที่ 2: คำนวณระยะทางในการเดินทางไปยังเพื่อนบ้านของโหนดทั้งหมดที่อัลกอริธึมยังไม่ได้เยี่ยมชมเมื่อสำรวจขอบจาก В หากระยะทางใหม่น้อยกว่าระยะทางเก่า เส้นทางผ่านขอบ B จะกลายเป็นเส้นทางใหม่ที่สั้นที่สุดสำหรับจุดยอดนี้
- ขั้นตอนที่ 3: ทำเครื่องหมายจุดยอด B ว่าเยี่ยมชมแล้ว
- ขั้นตอนที่ 4: ไปที่ขั้นตอนที่ 1
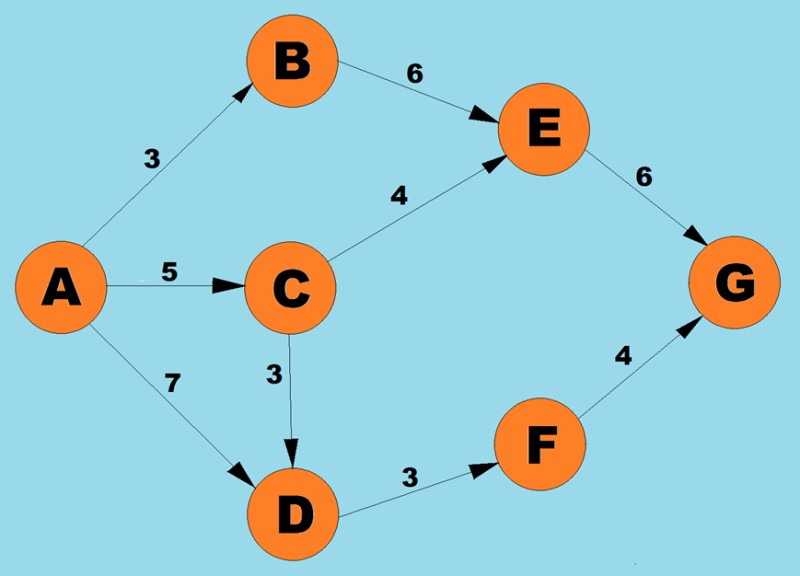 โดยใช้อัลกอริทึมข้างต้น เราจะกำหนดเส้นทางที่สั้นที่สุดจาก A ถึง G:
- มีสามเส้นทางที่เป็นไปได้สำหรับจุดยอด A: ไปยัง B ที่มีน้ำหนัก 3 ถึง С ที่มีน้ำหนัก 5 และไปยัง D ที่มีน้ำหนัก 7 ตามขั้นตอนแรกของอัลกอริทึม เราเลือกโหนดที่มีต้นทุนต่ำที่สุด (น้ำหนักขอบ) ในกรณีนี้ บี.
-
เนื่องจากเพื่อนบ้านที่ไม่มีใครเยี่ยมชมเพียงคนเดียวของ B คือจุดยอด Е เราจึงตรวจสอบว่าเส้นทางจะเป็นเช่นไรหากเราผ่านจุดยอดนี้ 3(AB) + 6(พ.ศ.) = 9.
ดังนั้นเราจึงบันทึกว่าเส้นทางที่สั้นที่สุดในปัจจุบันจาก A ถึง E คือ 9
-
เนื่องจากงานของเรากับจุดยอด B เสร็จสมบูรณ์แล้ว เราจึงดำเนินการเลือกจุดยอดถัดไปที่ขอบมีน้ำหนักขั้นต่ำ
จากจุดยอด A และ B ความเป็นไปได้คือจุดยอด D (7), C (5) หรือ E (6)
ขอบถึง С มีน้ำหนักน้อยที่สุด ดังนั้นเราจึงไปที่จุดยอดนี้
-
ต่อไป เช่นเคย เราจะค้นหาเส้นทางที่สั้นที่สุดไปยังจุดยอดข้างเคียงเมื่อผ่าน C:
-
AD = 5 (AC) + 3 (CD) = 8 แต่เนื่องจากเส้นทางที่สั้นที่สุดก่อนหน้า (AC = 7) น้อยกว่าเส้นทางนี้ถึง С เราจึงคงเส้นทางที่สั้นที่สุด (AC = 7) ไว้ไม่เปลี่ยนแปลง
-
CE = 5(AC) + 4(CE) = 9 เส้นทางที่สั้นที่สุดใหม่นี้เท่ากับเส้นทางก่อนหน้า ดังนั้นเราจึงปล่อยให้มันไม่มีการเปลี่ยนแปลง
-
-
จากจุดยอดที่ใกล้ที่สุดที่เข้าถึงได้ (E และ D) ให้เลือกจุดยอดที่มีน้ำหนักขอบน้อยที่สุด เช่น D (3)
-
เราพบเส้นทางที่สั้นที่สุดไปยังเพื่อนบ้าน F.
AF = 7(โฆษณา) + 3(DF) = 9
-
จากจุดยอดที่ใกล้ที่สุดที่เข้าถึงได้ (E และ F) ให้เลือกจุดยอดที่มีน้ำหนักขอบน้อยที่สุด เช่น F (3)
-
ค้นหาเส้นทางที่สั้นที่สุดไปยังเพื่อนบ้าน G.
เอจี = 7(โฆษณา) + 3(DF) + 4(FG) = 14
ดังนั้นเราจึงพบเส้นทางจาก A ถึง G
แต่เพื่อให้แน่ใจว่ามันสั้นที่สุด เราต้องทำตามขั้นตอนของเราบนจุดยอด E ด้วย
-
เนื่องจากจุดยอด G ไม่มีจุดยอดข้างเคียงที่ชี้ไปโดยขอบที่กำหนด เราจึงเหลือเพียงจุดยอด E เท่านั้น ดังนั้นเราจึงเลือกมัน
-
ค้นหาเส้นทางที่สั้นที่สุดไปยังเพื่อนบ้าน G.
AG = 3 (AB) + 6 (BE) + 6 (EG) = 15 เส้นทางนี้ยาวกว่าเส้นทางที่สั้นที่สุดก่อนหน้า (AG (14)) ดังนั้นเราจึงปล่อยให้เส้นทางนี้ไม่เปลี่ยนแปลง
เนื่องจากไม่มีจุดยอดที่นำจาก G จึงไม่สมเหตุสมผลที่จะรันขั้นตอนบนอัลกอริทึมบนจุดยอดนี้ นั่นหมายความว่าการทำงานของอัลกอริธึมเสร็จสมบูรณ์
public class Vertex {
   private char label;
   private boolean isInTree;

   public Vertex(char label) {
       this.label = label;
       this.isInTree = false;
   }

   public char getLabel() {
       return label;
   }

   public void setLabel(char label) {
       this.label = label;
   }

   public boolean isInTree() {
       return isInTree;
   }

   public void setInTree(boolean inTree) {
       isInTree = inTree;
   }
}public class Path { // A class that contains the distance and the previous and traversed vertices
private int distance; // Current distance from the starting vertex
private List parentVertices; // Current parent vertex
public Path(int distance) {
this.distance = distance;
this.parentVertices = new ArrayList<>();
}
public int getDistance() {
return distance;
}
public void setDistance(int distance) {
this.distance = distance;
}
public List getParentVertices() {
return parentVertices;
}
public void setParentVertices(List parentVertices) {
this.parentVertices = parentVertices;
}
}public class Graph {
private final int MAX_VERTS = 10;// Maximum number of vertices
private final int INFINITY = 100000000; // This number represents infinity
private Vertex vertexList[]; // List of vertices
private int relationMatrix[][]; // Matrix of edges between vertices
private int numberOfVertices; // Current number of vertices
private int numberOfVerticesInTree; // Number of visited vertices in the tree
private List shortestPaths; // List of shortest paths
private int currentVertex; // Current vertex
private int startToCurrent; // Distance to currentVertex
public Graph() {
vertexList = new Vertex[MAX_VERTS]; // Adjacency matrix
relationMatrix = new int[MAX_VERTS][MAX_VERTS];
numberOfVertices = 0;
numberOfVerticesInTree = 0;
for (int i = 0; i < MAX_VERTS; i++) { // Fill the adjacency matrix
for (int k = 0; k < MAX_VERTS; k++) { // with "infinity"
relationMatrix[i][k] = INFINITY; // Assign default values
shortestPaths = new ArrayList<>(); // Assign an empty list
}
}
}
public void addVertex(char lab) {// Assign new vertices
vertexList[numberOfVertices++] = new Vertex(lab);
}
public void addEdge(int start, int end, int weight) {
relationMatrix[start][end] = weight; // Set weighted edges between vertices
}
public void path() { // Choose the shortest path
// Set the initial vertex data
int startTree = 0; // Start from vertex 0
vertexList[startTree].setInTree(true); // Include the first element in the tree
numberOfVerticesInTree = 1;
// Fill out the shortest paths for vertices adjacent to the initial vertex
for (int i = 0; i < numberOfVertices; i++) {
int tempDist = relationMatrix[startTree][i];
Path path = new Path(tempDist);
path.getParentVertices().add(0);// The starting vertex will always be a parent vertex
shortestPaths.add(path);
}
// Until every vertex is in the tree
while (numberOfVerticesInTree < numberOfVertices) { // Do this until the number of of vertices in the tree equals the total number of vertices
int indexMin = getMin();// Get the index of the of the vertex with the smallest distance from the vertices not yet in the tree
int minDist = shortestPaths.get(indexMin).getDistance(); // Minimum distance to the vertices not yet in the tree
if (minDist == INFINITY) {
System.out.println("The graph has an unreachable vertex");
break; // If only unreachable vertices have not been visited, then we exit the loop
} else {
currentVertex = indexMin; // Set currentVert to the index of the current vertex
startToCurrent = shortestPaths.get(indexMin).getDistance(); // Set the distance to the current vertex
}
vertexList[currentVertex].setInTree(true); // Add the current vertex to the tree
numberOfVerticesInTree++; // Increase the count of vertices in the tree
updateShortestPaths(); // Update the list of shortest paths
}
displayPaths(); // Display the results on the console
}
public void clear() { // Clear the tree
numberOfVerticesInTree = 0;
for (int i = 0; i < numberOfVertices; i++) {
vertexList[i].setInTree(false);
}
}
private int getMin() {
int minDist = INFINITY; // The distance of the initial shortest path is taken to be infinite
int indexMin = 0;
for (int i = 1; i < numberOfVertices; i++) { // For each vertex
if (!vertexList[i].isInTree() && shortestPaths.get(i).getDistance() < minDist) { // If the vertex is not yet in the tree and the distance to the vertex is less than the current minimum
minDist = shortestPaths.get(i).getDistance(); // then update the minimum
indexMin = i; // Update the index of the vertex with the minimum distance
}
}
return indexMin; // Returns the index of the vertex with the smallest distance among those not yet in the tree
}
private void updateShortestPaths() {
int vertexIndex = 1; // The initial vertex is skipped
while (vertexIndex < numberOfVertices) { // Run over the columns
if (vertexList[vertexIndex].isInTree()) { // If the column vertex is already in the tree, then we skip it
vertexIndex++;
continue;
}
// Calculate the distance for one element sPath
// Get the edge from currentVert to column
int currentToFringe = relationMatrix[currentVertex][vertexIndex];
// Add up all the distances
int startToFringe = startToCurrent + currentToFringe;
// Determine the distance to the current vertexIndex
int shortPathDistance = shortestPaths.get(vertexIndex).getDistance();
// Compare the distance through currentVertex with the current distance in the vertex with index vertexIndex
if (startToFringe < shortPathDistance) { // If it is smaller, then the vertex at vertexIndex is assigned the new shortest path
List newParents = new ArrayList<>(shortestPaths.get(currentVertex).getParentVertices()); // Create a copy of the list of vertices of vertex currentVert's parents
newParents.add(currentVertex); // And add currentVertex to it as the previous vertex
shortestPaths.get(vertexIndex).setParentVertices(newParents); // Save the new path
shortestPaths.get(vertexIndex).setDistance(startToFringe); // Save the new distance
}
vertexIndex++;
}
}
private void displayPaths() { // A method for displaying the shortest paths on the screen
for (int i = 0; i < numberOfVertices; i++) {
System.out.print(vertexList[i].getLabel() + " = ");
if (shortestPaths.get(i).getDistance() == INFINITY) {
System.out.println("0");
} else {
String result = shortestPaths.get(i).getDistance() + " (";
List parents = shortestPaths.get(i).getParentVertices();
for (int j = 0; j < parents.size(); j++) {
result += vertexList[parents.get(j)].getLabel() + " -> ";
}
System.out.println(result + vertexList[i].getLabel() + ")");
}
}
}
}
public class Solution {

   public static void main(String[] args) {
       Graph graph = new Graph();
       graph.addVertex('A');
       graph.addVertex('B');
       graph.addVertex('C');
       graph.addVertex('D');
       graph.addVertex('E');
       graph.addVertex('F');
       graph.addVertex('G');

       graph.addEdge(0, 1, 3);
       graph.addEdge(0, 2, 5);
       graph.addEdge(0, 3, 7);
       graph.addEdge(1, 4, 6);
       graph.addEdge(2, 4, 4);
       graph.addEdge(2, 3, 3);
       graph.addEdge(3, 5, 3);
       graph.addEdge(4, 6, 6);
       graph.addEdge(5, 6, 4);

       System.out.println("The following nodes form the shortest paths from node A:");
       graph.path();
       graph.clear();
   }
}
GO TO FULL VERSION